

Showing posts with label Upcycle. Show all posts
Showing posts with label Upcycle. Show all posts
Friday, July 21, 2017
Woman's DIY Muscle Shirt
Is it just me, or are woman's muscle shirts trending? While cruising Michael's, I snagged this awesome Wonder Woman t-shirt decal for a great clearance price. I knew I wanted a muscle shirt, but I didn't want to just cut the sleeves off a tee and call it a day. I found this tutorial for creating a tank top from an old t-shirt. This tutorial is perfect, you get the comfiness of a t-shirt and the top is sleeveless and slightly fitted like a tank. Best of all...NO SEWING!


Thursday, April 27, 2017
Thrift Store Hutch Makeover
I love the thrift store for two reasons. First of all, and I'll come right out and say it, I'm cheap. Second, I hate to see things get thrown away that just need a little TLC to make them awesome again.


Friday, March 27, 2015
DIY Girl's Purse From A Stuffed Animal
I made this sweet bunny purse for my daughter just in time for Easter but you could use any stuffed animal for this cute project!
.jpg)

.jpg)
.jpg)
So I wanted to do this after I saw some really cute animal purses at Target. I got to thinking, maybe I could make one with an old stuffed animal. So often kids end up with more stuffed animals than they can ever play with. What a cool way to hold on to a cherished toy and re-purpose it into a fun bag. If you can't bring yourself to cut up one of your own stuffed animals, you can check out the thrift store. I know most people aren't into buying used stuffed animals, but take a look, you never know! I found this bunny at the thrift store. It was clean and in good shape. After a bath in the washing machine she's good as new!
When deciding on the animal to use, keep in mind the shape and position of animal. It's going to be hanging there by a strap. You want something that is going to look natural and not like it's hanging on for dear life! This bunny wouldn't have been my first choice. I was actually looking for a dog or cat but this was all I could find at the thrift store that day.
I found a couple tutorials online on how to sew in the zipper and lining. I put mine together by following this one. She even used a bunny too! Here are a couple more to check out...My Darling Rainbow and Knitting-and
.jpg)
What you need:
- stuffed animal
- zipper
- something for strap(I used a belt also from thrift store)
- fabric for lining
In the tutorial I followed, after cutting the opening for the zipper she flipped it right inside out and and sewed the lining and zipper. I wish it was so easy for me! I had to use a combination of sewing machine and hand sewing. It was a bit of a fight! After some harsh words, I figured it out and the bunny and I made up.
.jpg)
Finish sewing the straps on before closing the lining
.jpg)
.jpg)
.jpg)
I can't wait to try this again with a different animal. My daughter LOVES purses!

.jpg)
Thank you so much for visiting my blog!
Project Gallery
Project Gallery
I will be sharing with these great blogs!
Follow me here:
Friday, July 18, 2014
Upcycle Hand-Me-Downs, Summer Edition
It's such a bummer to have all these clothes for boys here and now I have a little girl that can't use them...or can she? I'm turning my boy's hand-me-downs into girl's clothes again!

I pulled out the clothes from storage and found a few pieces that had potential for summer refashions...

Overalls Cut Offs...This is the easiest makeover of the bunch! Just cut off pants and pull apart the bottom a bit to make them fray more. I didn't really like the red patch on the front pocket so I pulled it off and replaced with a crochet heart applique.
.jpg "overalls makeover")
T-Shirt Make Over...This shirt is very easy and best of all, when you use knit fabric, you can leave the edges unfinished. Trim shirt as pictured, sew the tops of front and back to make a pocket for the tie. Tie is bottom cut off of adult tshirt.

.jpg "tshirt makeover")

To see more refashions and all the projects I'm working on:
I will be sharing with these great blogs!
Follow me here:
Sunday, June 15, 2014
Turn A Man's Shirt Into A Skirt
I saw this on Pinterest and thought it was just brilliant so the last time my husband was cleaning out his closet, I grabbed one of his old shirts. This skirt is so easy, all you have to do is sew straight lines!
.jpg)
.jpg)
.jpg)
.jpg)

My daughter loves her new long skirt because it makes her feel like a princess!
Follow Over The Apple Tree's board Sewing Projects on Pinterest.
Want to see more sewing projects? Visit my project gallery
Follow Over The Apple Tree's board Sewing Projects on Pinterest.
Want to see more sewing projects? Visit my project gallery
I will be sharing with these great blogs!
Follow me here:
Pinterest / Facebook / Bloglovin' / Google+
Sunday, January 26, 2014
Upcycle Hand-Me-Downs 2
Turning boy's clothes into girl's clothes...again!
.jpg)


This is a boy's heavy, sweater-like shirt. I tried it on my daughter first to see what the fit was like. I wanted it to be a little more fitted so I cut off the sleeves and them trimmed excess fabric down the sides. I cut out a section from the back of the red sweater where I was going to insert the grey.

For the grey back section, I used a men's grey t-shirt and cut a section from the bottom of the shirt (keeping the original seam) about twice the width of the red sweater. Since I wanted it to hang a little lower in the center, I made the length longer in the center.


.jpg)
Now you just need to put the rest of the shirt back together, sew the sleeves back on(I made mine a little tighter) and down the sides.
I cut out a heart from the grey t-shirt for the front and attached it with a zigzag stitch.


More sewing projects from Over The Apple Tree
Sunday, November 10, 2013
Upcycle Hand-Me-Downs
Turn Boy's Clothes Into Girl's Clothes
I have two sons and hand me downs are a wonderful thing! I have Rubbermaid bins full of boy's clothes and every six months I've always gone through the drawers and rotated clothes. Then, I had a daughter. This has left me with a pile of clothes leftover from son #2 and nothing for my daughter. I have a couple friends that send me clothes from their girls, which is always a special treat, but I still end up having to buy a lot. As much as we try to convince our husbands that they're crazy, the woman's section of the store is just as big as the men's, it's a lie. We just need more stuff and same goes for little girls!
.jpg "Clothing Upcycle, Over The Apple Tree")
I started with a striped, long sleeved t-shirt and a brown men's t-shirt. As usual, I forgot a before picture, sorry! I placed a shirt that fits my daughter well on top of the boy's shirt to use as a guide. I trimmed the sleeves and sides to make it more fitted(remember to leave seam allowance). Then I cut around the neck line.

Now pin and sew up sides and sleeves.
When I looked online how to make a cowl neck everyone said just cut out a rectangle and sew to make a tube. I did that and didn't like it. It didn't hang lose the way I wanted so Here's how I cut mine out. This shape made it hang down lower and made it baggier.

With right sides together, sew side A to side B.

Now you're going to take the bottom, flip it up and line up to the top. The right side will be out and the wrong side together.


With the shirt inside out, slide the cowl inside the shirt and pin the lined up edges to the neck line of shirt. Now just sew the pinned neckline, then turn shirt right side out.
Using a white t-shirt I made some fabric flowers and ruffles for the pockets.


I attempted to explain this as clearly as I could, please let me know if you have any questions.
*Upcycle Hand-me-down #2 is done!
.jpg)
I will be sharing with these great blogs!
Follow me here:
Tuesday, May 7, 2013
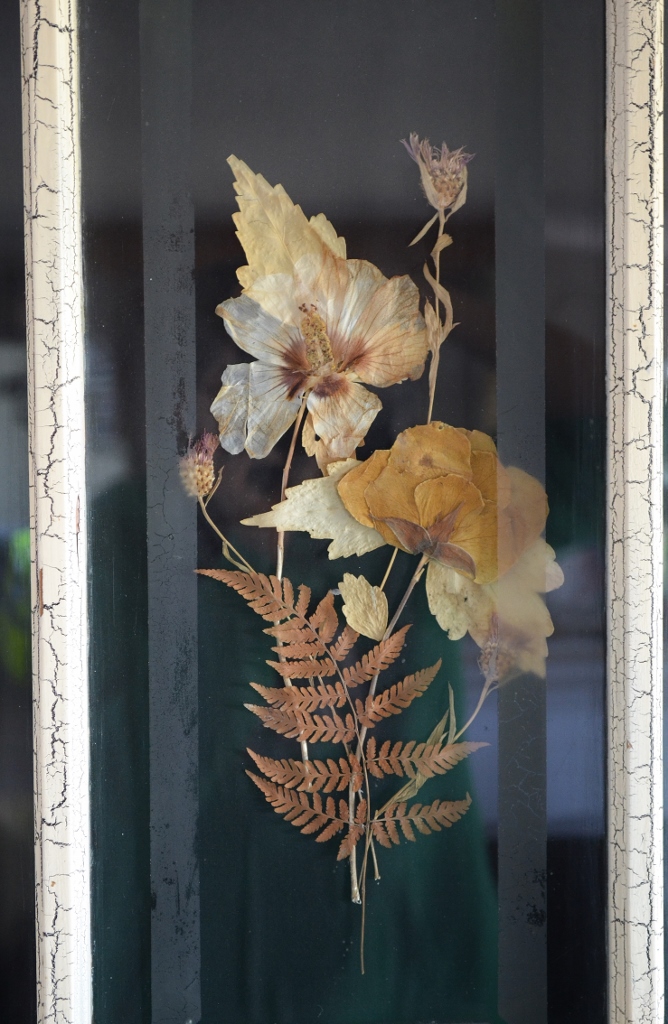
Reclaimed Window Into A Frame
Create a unique wall hanging with an old window
I saw this idea and not a week later the neighbors were replacing all their windows and put the old ones out on the curb...lucky day!!!



- Old window
- crackle paint
- frosted glass spray
- cardboard
- black fabric
- spray adhesive
- picture hanging kit
- duct tape


First, use tape and newspaper to protect glass and paint window frame. I used a crackle paint kit. Next, using masking tape and newspaper, cover frame and area of glass where you do not want the frost spray.


Attach the picture frame hanging kit.

I chose to display dried flowers in my frame, but you could put anything(pictures or antique handkerchiefs would be good too). Secure the cardboard panels with the duct tape.

I know there might be better ways to put this together that may be more secure, but I made this over ten years ago and it's still in good shape hanging on my wall. Good Luck!


Looking for more unique wall decor? Check out my Family Love Tree Carving!
Thank you so much for visiting my blog!
Project Gallery
Project Gallery
I will be sharing with these great blogs!
Follow me here:
