

Crochet trends spread fast in social media groups. The latest one is this crossbody bag made with 4 granny squares. There are a few versions floating around but my favorite was the Juniper Festival Crossbody Bum Bag by Casey Crochet. It's a paid pattern and is available on Etsy and Ravelry. I liked this one the best because it uses the sunburst granny square which I've used in other projects before and LOVE. Also, I really liked the look of the strap she designed. These bags are meant to be like fanny packs but worn as crossbody bags.
Obviously, I'm not writing this blog post to give out the pattern, you'll have to purchase that yourself. I do want to show what my finished one looks like and try to explain how I added the lining. This blog post has been updated with more photos and more detailed instructions.
I will be offering a limited number of these bags for sale in my Etsy shop

This design is pretty simple and honestly, I considered just throwing my own version together instead of buying the pattern but I'm happy to spend $6 and save myself the headache! I mean, have you ever written your own pattern? There's a reason people charge money for them, they take a LOT of time. Not only do you have to trial and error the project until you get it perfect, but then you have to type it up for yourself or other people to understand! It always takes longer than you think and inevitably you wonder "what was I thinking?"
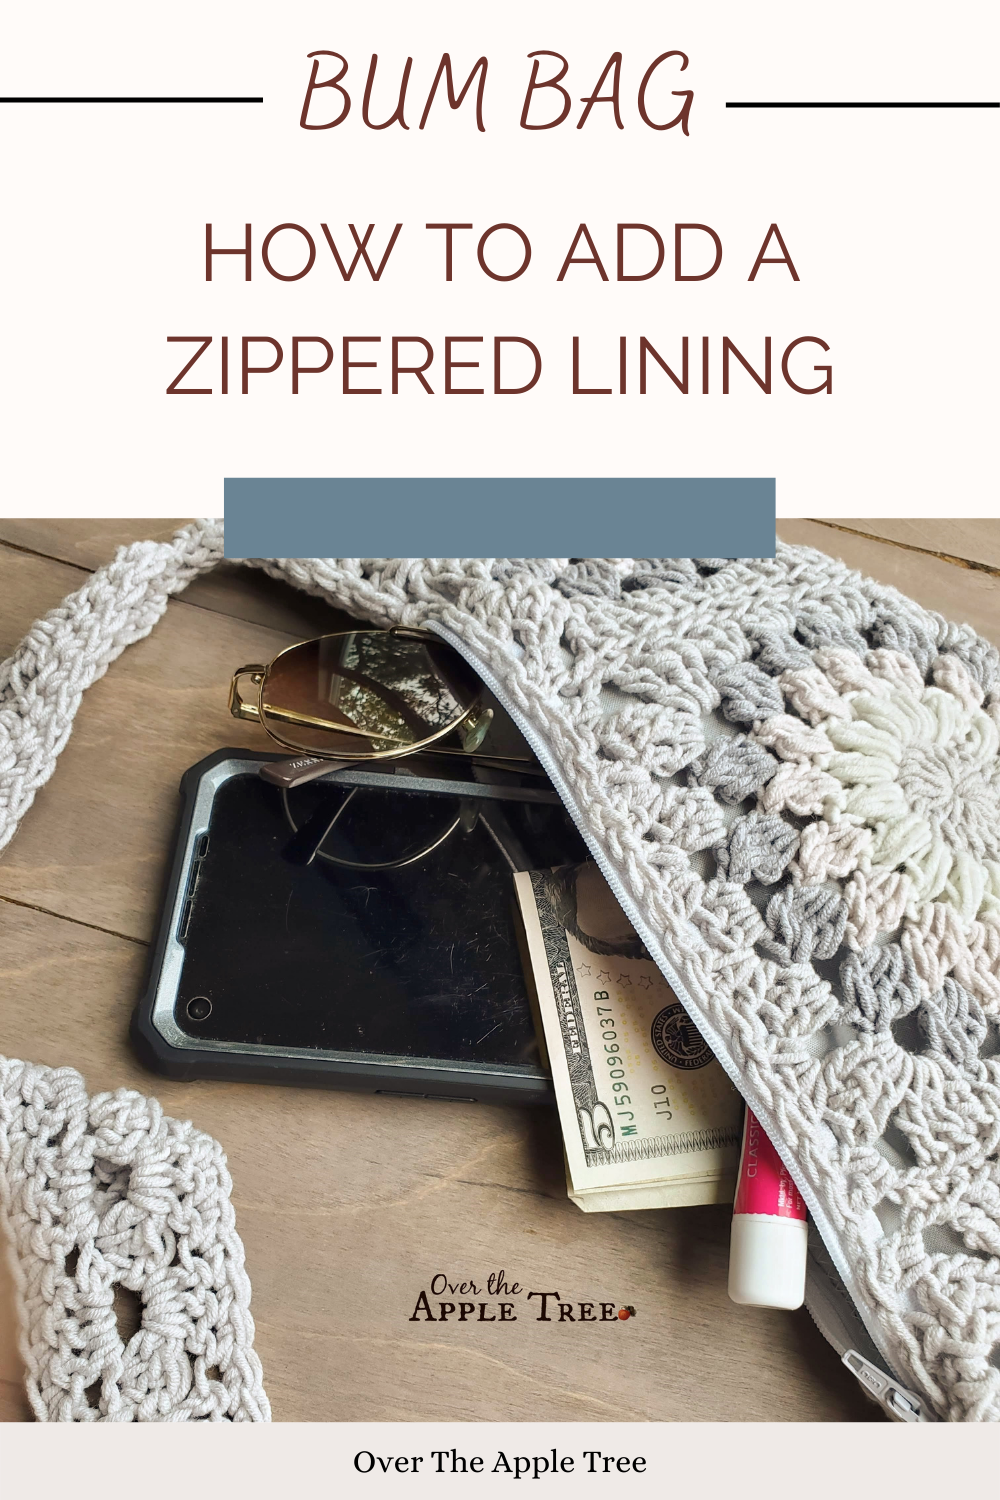
First things first, You need to choose a color coordinating fabric and zipper. My finished bag measures 15 inches across the top and I did not want the zipper to go across the whole length. I chose a 9-inch zipper, the perfect size to get items in and out of the bag without getting caught up. Fabric size...not too hard to figure out, I just grabbed a fat quarter. Your exact size will vary depending on your gauge.
Sooo...my one nitpicky regret here is that I got gray fabric and a white zipper for my first bag. The gray zipper they had I thought at the time was too dark. It wasn't until I put everything together that I noticed you can see the edge of my bright white zipper through the holes in the crochet. In hindsight, the darkish gray probably would have worked out better but no way I was starting over! A couple of the photos show the white zipper and the updated ones have a gray zipper.
I found it to be a good idea to assemble all the squares and weave in ends then add the lining before the strap. Lay your finished bag body onto your fabric(folded in half for 2 sides) and cut out the shape for the lining. I used pinking shears to reduce the frayed edges. Make sure you have enough for seam allowance.


Many people attach fabric linings to crochet by hand but I feel like if you're going to be yanking on a zipper to get in and out of this, it needs to be 100% secure. With the lining all done, I slipped it into the crochet bag and pinned the zipper edge to the edge of the crochet, sewing it together with a zig-zag stitch. You need to go slow and stop to adjust your stitches if you have to. Here is where I feel like an extra row of sc across the top might have been a good idea so my sewing machine would have more to grab onto. Obviously, if machine sewing onto crochet stitches offends you, go ahead and hand sew it.

Pin the ends and center first, then fill in with the rest. This will ensure it's all lined up properly.


Now the zipper is secure but the sides of the top edge are still open and you can see the lining. Here is where to start the instructions for adding the strap. It will get all closed up and be perfect!
You can see more of my projects in my Ravelry project gallery!


This crossbody bag you made came out beautiful looking and functional too. Have fun using your cute crocheted bag!
ReplyDeleteThis is beautiful! I love the colors and the sunburst design. I wouldn't have noticed the white zipper unless you noticed it, I think white was a good choice. Happy Sunday!
ReplyDeleteI LOVE your finished crossbody bum bag! What a terrific crochet project and thank you for taking a photo of how you did the inner bag - I always want to line my bags but never know where to start. Thank you for linking up at our weekly Link Party! You are being featured at our Wednesday Party #461 this week. Here’s the direct link to the post in case you’d like to share your feature:
ReplyDeletehttps://oombawkadesigncrochet.com/trendy-crochet-crossbody-bum-bag-open-edge-tee-crochet-spiral-circle-link-party-461/
Hope to see you again next week! Rhondda
May I ask what size your squares were?
ReplyDeleteAbout 5.5 inches
DeleteHola, gracias por compartir, esta preciosa! Me podras pasar las instrucciones para la correa por favor? Muchisimas gracias.
ReplyDeleteI cannot post instructions because this is a paid pattern. You need to purchase the pattern from Casey Crochet
DeleteHello, thank you for sharing these wonderful instructions. I'm about to sew the crochet onto the zipper, do you put all of the bag underneath the machine foot? Think I will have to adjust my machine if so to fit it under but not sure how to do it otherwise!
ReplyDelete