Showing posts with label Girl's Clothes. Show all posts

Sunday, May 3, 2015

Embellished Onesies

I have a new baby niece! While going through my daughter's baby clothes, I found four plain white Onesies. Since summer is on the way and she lives in the south, these definitely would be worn alone instead of used for layering. I immediately went in search of ways to style them up!

Embellished Onesies >> Over The Apple Tree

The first, and probably my favorite, is this heart doily design. I first dyed fabric with Rit dye. The free doily pattern comes from Red Heart. I crocheted it with a 1.65 hook. After pressing with an iron, I pinned onto the Onesie and used my sewing machine with a zigzag stitch to secure.

Embellished Onesies >> Over The Apple Tree

Embellished Onesies >> Over The Apple Tree

You can't decorate Onesies without doing at least one with necklaces! There are a billion tutorials online. I chose to mark the cloth with chalk first to make sure it would be even. Next I used my trusty dimensional fabric paint(puffy paint) to make the "beads". I crocheted a small flower with cotton yarn, added a button and hand sewed on.

Embellished Onesies >> Over The Apple Tree

Embellished Onesies >> Over The Apple Tree

For this one, I channeled Sex In The City's Carrie Bradshaw and made a gold name necklace! Again I dyed fabric with Rit dye. I drew the name on a piece of paper using dark ink and I put the paper inside the shirt. To make sure I could see the design through the fabric, I made a makeshift light box with a small glass end table and a desk lamp flipped upside down. Very carefully I used glitter dimensional fabric paint to trace the name design.

Embellished Onesies >> Over The Apple Tree

Embellished Onesies >> Over The Apple Tree

Embellished Onesies >> Over The Apple Tree

One more Onesie to go and you know how much I love Matryoshka dolls! I found a free printable from Design Is Yay and printed onto t-shirt transfer paper. After ironing on, I used dimensional fabric paint to add a design around the transfer.

Embellished Onesies >> Over The Apple Tree

Embellished Onesies >> Over The Apple Tree

I've had so much fun with this project! It's probably a good thing I only found 4 Onesies because I think I could have kept going!

Can you tell I love puffy paint? A few tips to remember are when using...1.)take your time! 2.)make sure there are no air bubbles 3.)allow to dry completely before you think about touching it!


Like DIY baby gifts?


Thank you so much for visiting my blog!
Project Gallery

I will be sharing with these great blogs!


Follow me here:

Friday, August 15, 2014

Bandanna Pants

 Turn two bandannas into cute pants for sleep or play!

Bandanna Pants by Over The Apple Tree

First of all, let me explain how I got to this idea. Like most craft enthusiasts, I'm on Pinterest...a lot. I came across these cute little dresses/shirts made from two bandannas. Such a simple, brilliant idea! You take two bandannas sew up the sides leaving space at the top for the arms and then sew down the tops making a pocket for ribbon which you tie at the shoulders to keep it on. Of course I ran right out and got bandannas and ribbon. I made the shirt(my daughter is a too old for this to fit as a dress), put it on and...drum-roll... she hated it. What? Why? It looks so cute in the pictures! To be fair it did look a little uncomfortable. The fabric, even after being washed was a little stiff and poofed out. Also the ribbons tied at her shoulders were all over the place and touching her face. Now what? I ripped out the seams and started over. 

While I was seeing the shirt dress idea on Pinterest, I also saw this idea for pants. Well ok, lets see how this works! 
  • take two bandannas and fold them in half, folds on the outside, seam on the inside.
  • using some pj pants you already have as a guideline, turn them inside out and push one of the legs inside the other. Line up the inside seam of the pj's and the bandanna to know where to cut out for the crotch of the bandanna pants.
  • after your bandannas are cut, sew up the inside seams of each then put the two sides together at the crotch, pin and sew.
  • fold down top to make a place to insert elastic or drawstring.
Bandanna Pants by Over The Apple Tree

Bandanna Pants by Over The Apple Tree

Because bandannas are the size they are, these pants just fit my five year old. This project is much better for a child a little smaller so they can grow into them. 

Be sure to also check out my bandanna skirt

Bandanna Pants by Over The Apple TreeBandanna Pants by Over The Apple Tree

Thank you so much for visiting my blog!
Project Gallery

I will be sharing with these great blogs!


Follow me here:

Friday, July 18, 2014

Upcycle Hand-Me-Downs, Summer Edition

It's such a bummer to have all these clothes for boys here and now I have a little girl that can't use them...or can she? I'm turning my boy's hand-me-downs into girl's clothes again! 

Upcycle boy's hand-me-downs into girl's clothes »Over The Apple Tree«

I pulled out the clothes from storage and found a few pieces that had potential for summer refashions...

Upcycle boy's hand-me-downs into girl's clothes »Over The Apple Tree«

Overalls Cut Offs...This is the easiest makeover of the bunch! Just cut off pants and pull apart the bottom a bit to make them fray more. I didn't really like the red patch on the front pocket so I pulled it off and replaced with a crochet heart applique


Upcycle boy's hand-me-downs into girl's clothes »Over The Apple Tree«

T-Shirt Make Over...This shirt is very easy and best of all, when you use knit fabric, you can leave the edges unfinished. Trim shirt as pictured, sew the tops of front and back to make a pocket for the tie. Tie is bottom cut off of adult tshirt. 

Upcycle boy's hand-me-downs into girl's clothes »Over The Apple Tree«

Upcycle boy's hand-me-downs into girl's clothes »Over The Apple Tree«

Tie Front Button Up...This shirt definitely took the most patience. I wouldn't say it was hard, but I had to go slow and I hate doing stuff slow! Carefully remove sleeves, and trim fabric up closer to collar. Measure and cut bottom of shirt leaving long sections in front for ties. I inserted some elastic in the back and then sewed up all rough edges. I added some lace to make little cap sleeves.
Upcycle boy's hand-me-downs into girl's clothes »Over The Apple Tree«

To see more refashions and all the projects I'm working on:

I will be sharing with these great blogs!


Follow me here:

Sunday, January 26, 2014

Upcycle Hand-Me-Downs 2

Turning boy's clothes into girl's clothes...again!

Upcycle hand-me-downs by Over The Apple Tree

So here is my second go at taking my boy's hand-me-downs and refashioning them for my girl.(see first clothing upcycle) I can certainly go and buy her new clothes and trust me, she has tons but it's fun to try something new and save some cash while I'm at it! I saw these shirts early in the season that had ruffled sections of sheer fabric in the back. I wanted to do something like that but since it's still winter, no sheer fabric over here! 


This is a boy's heavy, sweater-like shirt. I tried it on my daughter first to see what the fit was like. I wanted it to be a little more fitted so I cut off the sleeves and them trimmed excess fabric down the sides. I cut out a section from the back of the red sweater where I was going to insert the grey.

For the grey back section, I used a men's grey t-shirt and cut a section from the bottom of the shirt (keeping the original seam) about twice the width of the red sweater. Since I wanted it to hang a little lower in the center, I made the length longer in the center.


Hand-me-down refashioning by Over The Apple Tree

Ruffle this grey section by running the top edge through your machine with the stitch length and the tension settings turned all the way up. Now sew the top edge of the grey to the bottom edge of the back of the red sweater with zigzag stitch(don't forget to readjust the tension and stitch length back to normal).

Now you just need to put the rest of the shirt back together, sew the sleeves back on(I made mine a little tighter) and down the sides.

I cut out a heart from the grey t-shirt for the front and attached it with a zigzag stitch.

Hand-me-down refashioning by Over The Apple Tree


Hand-me-down refashioning by Over The Apple Tree


More sewing projects from Over The Apple Tree


I will be sharing with these great blogs!


Follow me here:

Sunday, November 10, 2013

Upcycle Hand-Me-Downs

Turn Boy's Clothes Into Girl's Clothes

I have two sons and hand me downs are a wonderful thing! I have Rubbermaid bins full of boy's clothes and every six months I've always gone through the drawers and rotated clothes. Then, I had a daughter. This has left me with a pile of clothes leftover from son #2 and nothing for my daughter. I have a couple friends that send me clothes from their girls, which is always a special treat, but I still end up having to buy a lot. As much as we try to convince our husbands that they're crazy, the woman's section of the store is just as big as the men's, it's a lie. We just need more stuff and same goes for little girls!

Refashion boys clothes in to girl's clothes, upcycling tutorial by Over The Apple Tree

After seeing the idea on Pinterest, I thought I would try to upcycle some of the boy's clothes into girl's clothes. Here is my first attempt and I think it turned out pretty cute!

I started with a striped, long sleeved t-shirt and a brown men's t-shirt. As usual, I forgot a before picture, sorry! I placed a shirt that fits my daughter well on top of the boy's shirt to use as a guide. I trimmed the sleeves and sides to make it more fitted(remember to leave seam allowance). Then I cut around the neck line.


Now pin and sew up sides and sleeves.

When I looked online how to make a cowl neck everyone said just cut out a rectangle and sew to make a tube. I did that and didn't like it. It didn't hang lose the way I wanted so Here's how I cut mine out. This shape made it hang down lower and made it baggier.


With right sides together, sew side A to side B. 


Now you're going to take the bottom, flip it up and line up to the top. The right side will be out and the wrong side together. 
Diagram how to make a cowl neck shirt by Over The Apple Tree

With the shirt inside out, slide the cowl inside the shirt and pin the lined up edges to the neck line of shirt. Now just sew the pinned neckline, then turn shirt right side out.

Using a white t-shirt I made some fabric flowers and ruffles for the pockets.

Refashion boy's clothes into girls' clothes, Upcycling tutorial by Over The Apple Tree

Refashion boy's clothes into girl's clothes, Upcycling tutorial by Over The Apple Tree

I attempted to explain this as clearly as I could, please let me know if you have any questions.


I will be sharing with these great blogs!

Follow me here:

Monday, April 22, 2013

Creative Patches For Kid's Jeans

How To Make Kid's Jeans Last A Little Longer

If you have kids, you know what they do to their jeans and how the cost of new clothes can add up. Here are a couple cute ideas to stretch the life of those "ruined" pants.

Monster Mouth
The first idea is one I've seen floating around Pinterest and worked well with my son's pants that had a huge hole. Of course it started as a small rip and throughout the course of the day at school, he made it worse. These were really cool, distressed jeans that fit great and I hated to have to throw them out, so we tried the monster face. I used some scrap red fabric for the inside of the mouth and white felt for the eyes and teeth. Just cut red fabric a little bigger than the size of the hole and with the teeth, attach to inside of jeans with sewing machine. This took a little finesse, good thing these pants were baggy! Next cut circles for eyes and sew those on as well. My son thinks these are so cool and yippee, pants have been saved!


Flower Child
The hole in my daughter's pants was caught early, so it was still pretty small. I got a twill iron-on patch from Walmart's craft department. I wanted to style it up a bit so, after we decided on flowers, I cut one big enough to cover the hole. Before ironing on, I used yellow thread in the sewing machine and went back and forth to make a yellow center for our flower. Then I used pink thread and stitched around the edge of flower.
I also cut out two additional flowers, just to even out the look on the other side and ironed on. These pants still fit in the waist but were starting to get a little short so, I just attached some lace and ribbon to the bottom cuff. This added the length we needed and looks really cute. 


Super Star
Another hole, of course. It was bound to happen with these ones, the denim was so thin. I got another iron-on patch and this time, cut out stars. Of course, just the knees needed to be done but why not go all out? After I ironed on, I went around the edges with some dimensional glitter craft paint. Afterward I wished I had done it with silver, but gold is what I already had in the house and seriously, a four year old doesn't really care what color the glitter is.


Thank you so much for visiting my blog!
Project Gallery

I will be sharing with these great blogs!


Follow me here:

Saturday, March 9, 2013

Girl's Nightgown Made From Men's T-Shirts

Great Way To Upcycle Old T-Shirts

I used two men's undershirts for this peasant-style nightgown. This is for two reasons: first, it's nice to be able to reuse something that was destined to become a rag and second, I could have really messed this up and didn't want to waste money on fabric. Have I mentioned that I'm cheap? I know nothing about making clothes, but I wanted to give this a try and I really love how it turned out.

T-Shirt Upcycling by Over The Apple Tree

I didn't have a pattern to follow, pretty much made it up as I went along as you can see from my rough pattern I fashioned from scrap paper that was laying around! After I got an idea of the size and shape I would need from another of my daughter's shirts, I started cutting.


The back and front of the nightgown was cut from the backs of the t-shirts because these were v-necks and the backs had more surface area.


The sleeves I laid out and cut so that the original hem of the shirt would be the cuff of the sleeve.


Line up and pin right sides of fabric together. Sew these top seams.


Now, while still inside out, pin the bottoms of sleeves and down sides of gown. Sew together, stopping about an inch before you reach the cuff of sleeve.

OK, so I wasn't lying when I said I'm an amateur...look at this neckline! Not quite right huh? Believe it or not, I actually did this on purpose because I wasn't really sure how I was going to deal with this part and needed some wiggle room to figure it out.


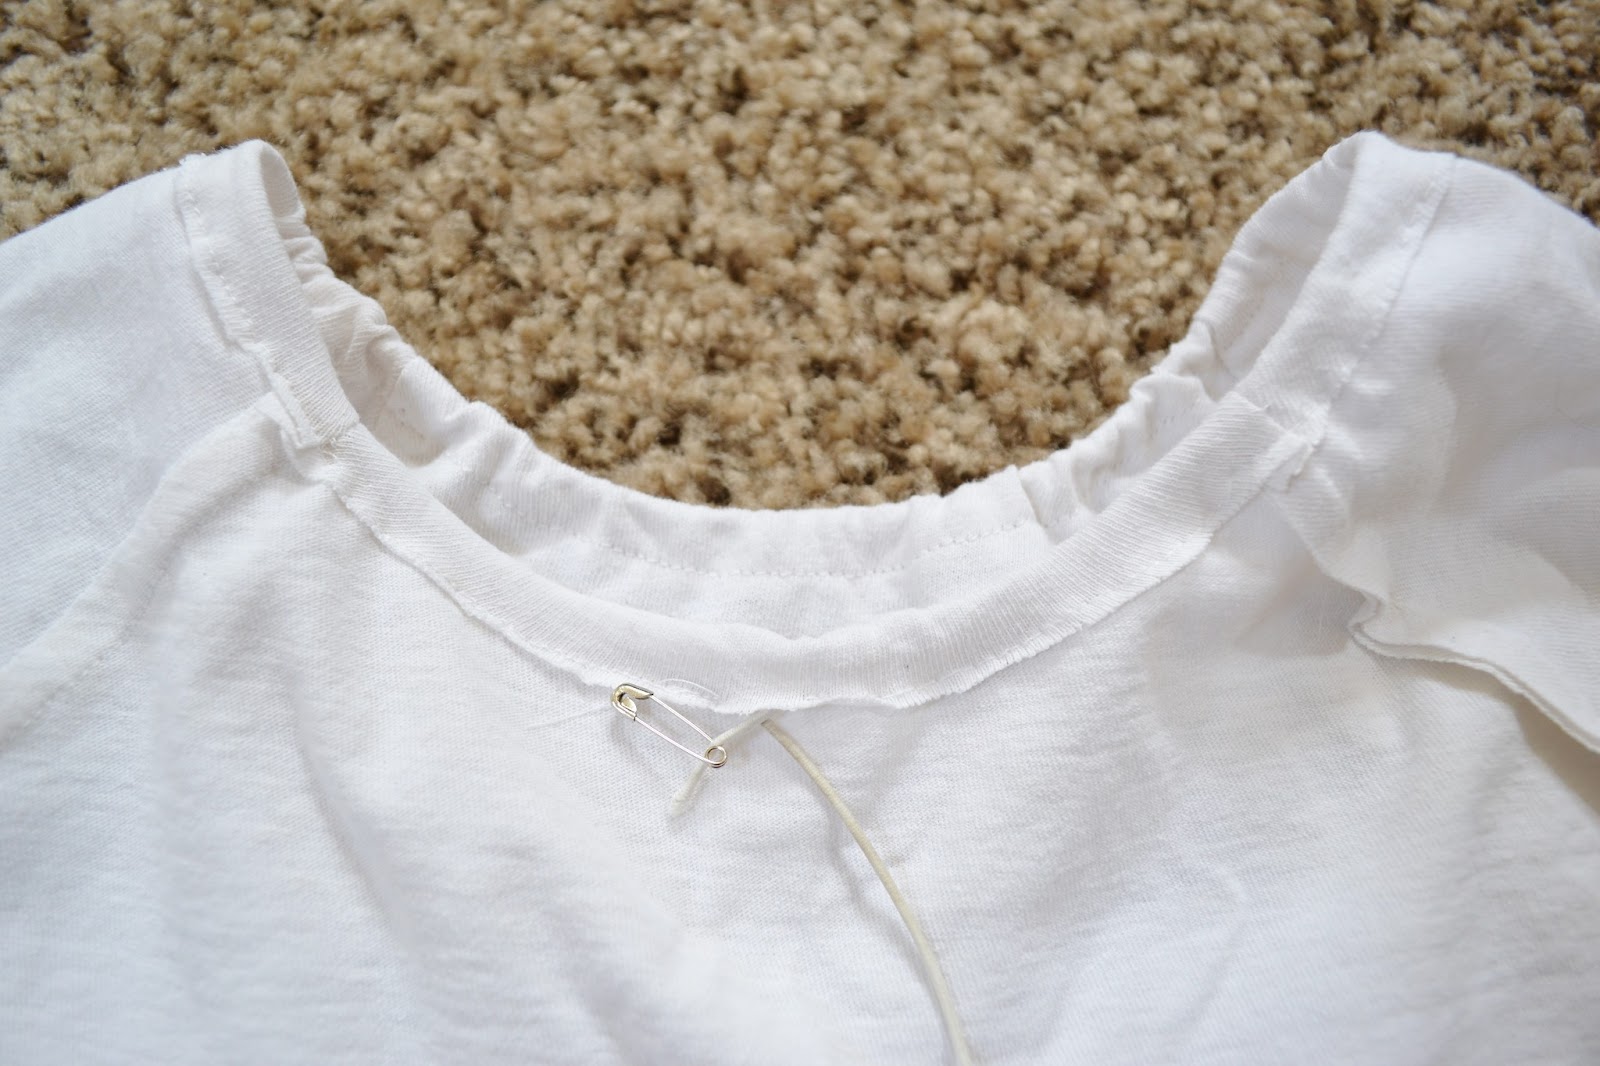
 After I figured out how wide I wanted it, I cut, folded over and sewed, leaving a small opening in the back so I could insert the elastic cord. Tie off cord and sew opening close.


The gown and sleeves weren't quite as long as I wanted, so I cut strips of fabric to ruffle and attach to bottoms.


 My thinking when I used the original seam for the cuffs was to insert elastic in it. I still wanted to do this, so when I attached the ruffle for the sleeves, I sewed very close to the edge making sure there was still room to insert elastic then closed up opening.


T-Shirt Upcycling by Over The Apple Tree

I added some decorative ruffle strips in the front and that's it! My daughter calls this her princess pajamas because it looks like what the Disney princesses wear!

T-shirt Upcycling by Over the Apple Tree


For more fun tutorials go HERE

I will be sharing with these great blogs

Follow me here:
Related Posts Plugin for WordPress, Blogger...