Showing posts with label vintage. Show all posts

Sunday, June 28, 2015

Crochet Covered Wooden Shoe

I couldn't pass up this cool Dutch wooden shoe from the thrift store! As mentioned before in my Updated Brass Plates post, some of my family hails from the Netherlands. I have a small collection of wooden clogs and if I ever come across some at Goodwill, I can't resist! So I found this one shoe hanging out all by itself. It was unfinished with names burned into it, maybe a souvenir? I grabbed it up and figured I could paint it or something. I've been looking at this thing for months trying to think of a unique way to decorate it without ruining it. Then, inspiration struck...I'll crochet it!

Crochet Covered Wooden Shoe, Dutch Shoe - Over The Apple Tree

Crochet Covered Wooden Shoe, Dutch Shoe - Over The Apple Tree

Crochet Covered Wooden Shoe, Dutch Shoe - Over The Apple Tree

The first thing I did was get rid of the names. I used a knife and some sandpaper to scrape them off. It didn't have to be perfect because I was going to cover it anyway. Next I stained and did a light coat of spray-on polyurethane.

Crochet Covered Wooden Shoe, Dutch Shoe - Over The Apple Tree

The crochet lace was done in five pieces and then sewn/crocheted together onto the shoe. The hardest part was finding patterns I liked and figuring out how it could all fit together. The top section is a round doily with three sections I added on to make it more of a triangle. The front/bottom and sides are three of the same made out of a triangle shawl pattern. The last piece is the top. It's a strip of two sided shells that goes around the opening of the shoe. Pieces are sewn together and I added more crochet on the back to cover open areas.

I won't say this was easy. It did take some time with all the trial and error I went through, but it was definitely worth it and I love the end result!

Crochet Covered Wooden Shoe, Dutch Shoe - Over The Apple Tree

Crochet Covered Wooden Shoe, Dutch Shoe - Over The Apple Tree

Crochet Covered Wooden Shoe, Dutch Shoe - Over The Apple Tree


Thank you so much for visiting my blog!
Project Gallery

I will be sharing with these great blogs!


Follow me here:

Thursday, June 11, 2015

Updated Vintage Brass Plates

I inherited these Lombard brass wall plates from my grandmother. From what I can find online, these have been knocking around her house since the 50's! I was a little torn whether I should alter them at all. In the end I decided to go for it because there's no way I was hanging them in my house as they were. As cool as vintage stuff is, I just don't dig beat up ugly brass but really do love the Dutch scene on them. My ancestors are from the Netherlands!

Update vintage brass plates with spray paint >> Over The Apple Tree

The first thing I did was give these a really good cleaning. I used vinegar, water and a scrubby sponge. While researching online how to paint brass everyone says to prime first. Well I'm lazy and the store had spray paint with primer in it! That counts right? I ended up using Krylon Cover Maxx. I did several light coats until it was completely covered. Torture! I hate waiting for paint to dry. After the white, I took some Valspar Tanslucent Color Glaze(Mocha) and applied it with a q-tip into the areas that I wanted a little darker. I wiped it off with a dry rag and played with it until I got the look I wanted. I think the glaze really helps the design pop.

Update vintage brass plates with spray paint >> Over The Apple Tree

Update vintage brass plates with spray paint >> Over The Apple Tree

Update vintage brass plates with spray paint >> Over The Apple Tree

Update vintage brass plates with spray paint >> Over The Apple Tree


Thank you so much for visiting my blog!
Project Gallery

I will be sharing with these great blogs!

Follow me here:

Thursday, April 23, 2015

Crochet Jar

I love to find ways to recycle trash into something useful. I have been waiting patiently for someone to finish off this jar of pickles so I could crochet it!
I used this pattern

Crochet Jar, Over The Apple Tree

Crochet Jar, Over The Apple Tree

Crochet Jar, Over The Apple Tree

These jars could be used for holding flowers, pencils or candles. They would even make cute center pieces for a vintage wedding.

Thank you so much for visiting my blog!
Project Gallery

I will be sharing with these great blogs!


Follow me here:


Friday, July 26, 2013

Designer Inspired Lampshade

Designer Knock-off Lampshade

I got some "PINsperation" for this lamp shade from Mama Says Sew. They have a great tutorial here that I followed with a few small exceptions. I'm not going to rewrite the whole tutorial but I will let you know what I did differently. First of all, get comfortable in front of a movie or marathon of your favorite TV series because this takes some time!


I had an old, king size, white, flat sheet and I cut it in half. I dyed one of the halves pink with some Rit dye in the washer. Cut out a piece of fabric to cover the lamp shade and use the rest for tearing the strips. Some of my strips were slightly larger than the 1 inch recommended in tutorial = fatter flowers(swirls). The tutorial says you should not attach fabric to shade yet and then hold the flowers in your hand, glue and flip onto fabric. I believe it should read...flip and pray it landed in the right spot and didn't unravel! After flipping the first few, I changed my method because apparently I don't have the coordination for doing it that way. 

I used a light layer of spray adhesive and attached the fabric to my shade, if you don't have it on there straight, you can always re-position. Then hot glued the seam, top and bottom edges over.  I found the best way to get the glue on the flower is to hold the glue gun a few inches over it and move back and forth, letting the glue fall where you want it. Holding the flower in my hand, I grabbed the fabric covered shade and lowered it down into the glued flower. 


My lampshade doesn't look exactly like Mama Says Sew tutorial or the original Anthropologie one for that matter, but it works for me.

** original tutorial I followed from Mama Says Sew's blog

Thank you so much for visiting my blog!
Project Gallery

I will be sharing with these great blogs!

Follow me here:

Saturday, June 22, 2013

Vintage Style Apron


Vintage Style Aprons

This is my first contribution to Over The Apple Tree and I'd like to share my sewing endeavor I took on this afternoon during a little downtime from a thunderstorm. Sewing is not my thing. I'm that girl who always ends up with strings jammed in the bobbin somehow. And I always seem to think up these grand ideas that involve sewing and quickly give up once I pull out that sewing machine. So, in light of conquering a machine and learning new skills I have decided to take on sewing.

I'm easing into things with a simple project inspired by my grandmother Clara's original handmade apron. She taught me to knit, crochet, bake, and craft but I never thought to ask her how to sew!


While thrift shopping for other projects I found this adorable skirt below but of course it was a size 0. I immediately thought of my grandmother's apron and thought how easy it would be to transform this skirt.


I started by folding the skirt in half with the button on one end and the tag side on the other and laying in out on the table (basically side to side instead of front to back as shown above).

I made one cut up the skirt from the bottom to the waste about 6in from what is the back of the skirt. This way when you opened up the skirt and laid it flat the pockets were symmetrical and the button in the middle of the apron.


Then I took the back piece for the straps and unfolded it and cut it into equal pieces in width.
Next I ironed the hem line edges of the sides of what was now the apron by folding a 1/2" piece over and ironing and then repeating once more for a clean edge. I also ironed the hem lines of the strap pieces in the same manner.

After sewing all the edges I attached the straps one on each side at the top of the apron and the project was complete! It took about 30 minutes all together and that included one small fight with the sewing machine.


To see more great vintage items visit Queen St. Artisan's Etsy shop


Follow me here:
Shared With: Craft-O-Maniac
                       Etsy Cottage Style


Saturday, March 9, 2013

Girl's Nightgown Made From Men's T-Shirts

Great Way To Upcycle Old T-Shirts

I used two men's undershirts for this peasant-style nightgown. This is for two reasons: first, it's nice to be able to reuse something that was destined to become a rag and second, I could have really messed this up and didn't want to waste money on fabric. Have I mentioned that I'm cheap? I know nothing about making clothes, but I wanted to give this a try and I really love how it turned out.

T-Shirt Upcycling by Over The Apple Tree

I didn't have a pattern to follow, pretty much made it up as I went along as you can see from my rough pattern I fashioned from scrap paper that was laying around! After I got an idea of the size and shape I would need from another of my daughter's shirts, I started cutting.


The back and front of the nightgown was cut from the backs of the t-shirts because these were v-necks and the backs had more surface area.


The sleeves I laid out and cut so that the original hem of the shirt would be the cuff of the sleeve.


Line up and pin right sides of fabric together. Sew these top seams.


Now, while still inside out, pin the bottoms of sleeves and down sides of gown. Sew together, stopping about an inch before you reach the cuff of sleeve.

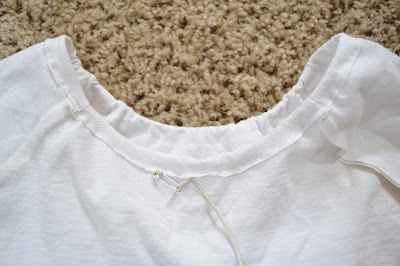
OK, so I wasn't lying when I said I'm an amateur...look at this neckline! Not quite right huh? Believe it or not, I actually did this on purpose because I wasn't really sure how I was going to deal with this part and needed some wiggle room to figure it out.


 After I figured out how wide I wanted it, I cut, folded over and sewed, leaving a small opening in the back so I could insert the elastic cord. Tie off cord and sew opening close.


The gown and sleeves weren't quite as long as I wanted, so I cut strips of fabric to ruffle and attach to bottoms.


 My thinking when I used the original seam for the cuffs was to insert elastic in it. I still wanted to do this, so when I attached the ruffle for the sleeves, I sewed very close to the edge making sure there was still room to insert elastic then closed up opening.


T-Shirt Upcycling by Over The Apple Tree

I added some decorative ruffle strips in the front and that's it! My daughter calls this her princess pajamas because it looks like what the Disney princesses wear!

T-shirt Upcycling by Over the Apple Tree


For more fun tutorials go HERE

I will be sharing with these great blogs

Follow me here:
Related Posts Plugin for WordPress, Blogger...