Monday, August 19, 2013

Fabric Memo Board

DIY Fabric & Ribbon Memo Board

MADE FROM THRIFT STORE PAINTED CANVAS
( OK, I know I didn't reinvent the wheel here. There are a billion memo board tutorials out there...but mine is cool zebra print!)

Fabric Memo Board >> Over The Apple Tree

I went to the Goodwill Saturday sale, and wouldn't ya know, they had an ugly canvas painting for a couple bucks...SCORE! I love to upcycle thrift store finds. My teen neighbor has been redecorating her room and her birthday is coming up, of course I had to make something! I love memo/bulletin boards. You can display photos, artwork, papers you don't want to loose, all without poking holes into your walls. I got my son a huge cork board for his own room because he's an artist and always has something to hang. Since this gift is for a girl, I needed to style it up.

Fabric Memo Board >> Over The Apple Tree

Supplies:
  • stretched art canvas(new or do what I did and check thrift stores)
  • fabric
  • batting
  • buttons
  • staple gun
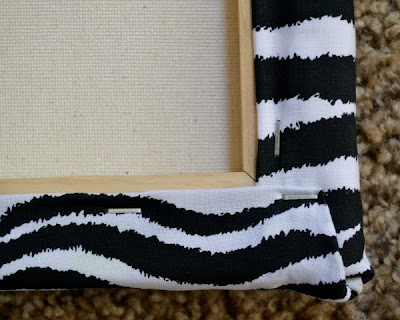
Lay canvas face down on batting. Cut batting so there's enough to cover sides when it's folded back. Now lay canvas and batting on top of fabric. Cut so there's enough fabric to reach around to the back of the frame and edges to be folded under. Fold the rough edge of your fabric under, wrap around to the back and staple, doing the center of each side first then move your way to the corners.

Fabric Memo Board >> Over The Apple Tree

Decide how you want the ribbon and lay on top of fabric. Secure outer edges with tape and flip over. You can also cover with foam core board and flip both together to help all the ribbons stay in place.

Fabric Memo Board >> Over The Apple Tree

I used a lighter to melt the edges of the ribbon just to make extra sure they wouldn't fray and then folded under the edges and secured with staple.

Fabric Memo Board >> Over The Apple Tree

The last thing to do is attach buttons where the ribbon crosses with needle and thread, go right through the canvas and tie in back. You could also attach a saw tooth picture hanger.

Fabric Memo Board >> Over The Apple Tree

That's it, easy right? Thanks for visiting!


Thank you so much for visiting my blog!
Project Gallery

I will be sharing with these great blogs!

Follow me here:

Sunday, August 11, 2013

Simple driftwood wind chimes

I decided how to show off my beach souvenirs from various vacations with this easy project and add some decor to my outdoor space.

Driftwood Chimes, Over The Apple Tree

First I gathered my supplies and the remnants of the beach I brought home from my last beach day. Of course being in Charleston, SC I am spoiled and have access to the beach all the time. The good thing about this project is that you could literally use any type of rocks, shells, sticks, beads, or even interesting coins. Just be creative and think of how you can use it to display those little things you or your child collect on hikes or vacation. 

Driftwood Chimes, Over The Apple TreeI purchased a small candle holder ($1 from Goodwill) to use for the top portion to hang the chimes, a pendant charm to dangle at the end, and some hemp string to tie it all together. The wind chimes themselves were cheap plain chimes I found for $5 at World Market.

I disassembled the chimes first. Then I started by taking each chime and tying on the decorative items. I used sea glass from the beaches of Italy, driftwood from the beaches of Charleston, and shells from the beaches of Belize. After I tied on each item to a chime I hung the longest chime the lowest onto the  "hanger" fashioned from the candle holder. After this I hung each chime higher than the next forming a spiral around the circle. 

When I finished I took the metal pieces from the original chimes that create the noise and tied those on a long piece of string with the weighted pendant on the end. This string hangs in the middle and is what clinks against the chimes to make the noise. 

Now my beach treasures aren't sitting in a box forgotten anymore!

Driftwood Chimes, Over The Apple Tree
Project contributed by Tara

Thank you so much for visiting my blog!
Project Gallery

I will be sharing with these great blogs!


Have you thought of getting away to the beach? I know the owner of this great rental property who still has dates still available! Visit Florida West Coast Rentals to get more info and check out all the amenities.
Florida West Coast Rentals, Bradenton,FL


Follow me here:

Friday, August 9, 2013

Caribbean Banana Crêpes

Caribbean Banana Crêpe Recipe

Impress your friends with this crazy delicious brunch or dessert crepe recipe. I guess the rum is what makes these "Caribbean" but you can definitely leave it out and they are still just as fantastic!

Recipe for Caribbean Banana Crepes by Over The Apple Tree

Banana Sauce
  • 1 cup packed brown sugar
  • 1 1/2 tbsp cornstarch
  • 1 cup water
  • 1/4 cup butter/margarine
  • 1/4 dark rum
  • 3 bananas sliced
Combine brown sugar and cornstarch in medium saucepan. Stirring constantly over med-high heat, gradually add water. Bring mixture to a boil and cook 3 minutes. Add butter, stir till butter is melted. Remove from heat, stir in rum and bananas.

Crepes(Better Homes And Gardens)
  • 2 beaten eggs
  • 1 1/2 cups milk
  • 1 cup flour
  • 1 tbsp cooking oil
Combine ingredients and beat till well mixed. Heat lightly greased, nonstick skillet, remove from heat. Spoon 2 tbsp batter; lift and tilt skillet to spread batter. Return to heat and lightly brown one side only. Turn onto paper towel. Pour banana sauce onto crepe and fold over. Can be topped with whipped cream.

More recipes from Over The Apple Tree

Follow me here:
Pinterest / Facebook / Bloglovin'

Shared with: Tatertots and Jello-Link Party Palooza
                    Craft-O-Maniac
                    Dukes and Duchesses-Project Inspired

Sunday, August 4, 2013

Hallway Hook Board

Do you have a place to organize all that

back-2-school clutter?

Yup, it's that time of year again...backpacks, lunch bags and jackets everywhere. I've finally had enough. This hallway (where my washer and dryer also happen to live) is where we all walk through when we get home and is also where everyone drops their junk. I obviously needed some organization system and I think this will do the trick. The lower hooks are just the right height for the smaller kids to reach so they can't possibly have any excuse for not hanging up their stuff now right?

Hallway Hook Board by Over The Apple Tree

This project is stupid easy! 
  1. Get long pieces of wood
  2. Paint, stain, sand, distress to your hearts content
  3. Attach metal hooks(bought these at Walmart in pack of six)
  4. Screw the whole thing to wall, make sure you get the studs!
  5. Train your children to use
Hallway Hook Board by Over The Apple Tree


Please Follow Me At:

Shared With: I Should Be Mopping The Floor
                     Dukes and Duchesses

Related Posts Plugin for WordPress, Blogger...