Thursday, November 30, 2017

Wood Countertop, Bathroom DIY

I always knew this 80's countertop in my bathroom wouldn't be here forever, I just had other projects that were higher on my list of priorities! Well, it finally happened, I decided I couldn't look at this counter for 1 more day.

DIY Wood Bathroom Countertop, Over The Apple Tree

A few years ago, we took a weekend to give this downstairs bathroom a tiny face lift. We framed the builder grade mirror, painted the cabinet and gave the walls a fresh coat of paint. I never liked this countertop, but I could live with it until we finished other stuff in the house.


Like a lot of projects I do, I saw this on Pinterest! I figured this would be a fast and easy project, just pop off the old counter, touch up the paint and spend a couple hours putting together the new countertop...NOPE!
  • Pop off the old countertop 
  • Build new countertop, stain, add a billion coats of poly 
  • Buy a new sink because all the sinks toilets and tubs in this house are bone colored and I already changed out this toilet to white
  • Apply knockdown plaster on the wall behind toilet where the counter was attached 
  • Realize that the color of the stain and the tile back splash I chose clashes with the cabinet and wall color
  • Repaint walls and cabinet
  • Touch up the molding paint
  • Touch up black molding around mirror
  • Notice with the new, lighter wall color, the ceiling isn't really white and now looks horrible and needs to be painted as well
  • Install the countertop and tile back splash
  • Even though the counter is exactly what I wanted, the new wall color I chose is way lighter than I thought it was and now I want to paint the walls again and maybe the cabinet too...
Home DIY is never as fast and simple as we think it will be. Oh well, what can you do?!

I don't have a detailed tutorial for this countertop, but you can pretty much see how it was done from the photos. Everyone might need a slightly different method depending on what you're replacing and your existing fixtures. After I stained, I applied several layers of polyurethane. The sink was attached and sealed in place with clear silicone caulk and I used the same caulk to seal the gaps between the three pieces of wood.


DIY Wood Bathroom Countertop, Over The Apple Tree

DIY Wood Bathroom Countertop, Over The Apple Tree

DIY Wood Bathroom Countertop, Over The Apple Tree

DIY Wood Bathroom Countertop, Over The Apple Tree

DIY Wood Bathroom Countertop, Over The Apple Tree


I will be sharing with these great blogs!


Follow me here:

Wednesday, November 15, 2017

My Product Photography

I see it all the time, people posting bad photos of their awesome products!

Product Photography, Over The Apple Tree

Whether it's for your blog, your shop, or you just want to share your latest product on social media, you should have good photos. You spent a lot of time on your projects and you're proud of them, nothing wrong with that! Make sure your photos are the best representation of your work that they can be.

I'm not a professional photographer. 
You and I might not be professionals, but we know if something looks bad in a photo, we probably won't buy it. Same goes for the people looking at our products. I spend a lot of time on my crochet items and I want them to look the best they can and as close as possible to real life. When a person orders something from my Etsy shop, I want them to know exactly what they're getting. Photos are important. My photos aren't perfect, but over the last 4 years I've taken a LOT of pictures and I've found some things that work for me and they might help you if you find yourself stuck on where to start.

*I mostly shoots pics of my crochet projects, but these tips could be used for lots of different products. Here's a peek at my photos, supplies and some behind the scenes shots.

You can read 1,000 articles on how to improve your photos but they won't get better until you PRACTICE and try different things to see what works for you. 

Friday, September 29, 2017

Wintry Hooded Scarf


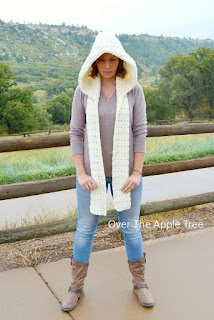
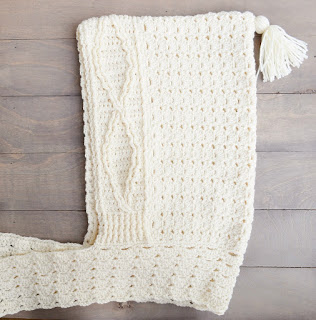
Check out this cozy winter scarf! This pattern has so many great elements that make it unique, beautiful and functional.

Wintry Hooded Scarf, Over The Apple Tree

I have an awesome library system where I live. I have access to lots of great pattern books and I spotted this Green Mountain Spinnery Hooded Scarf pattern in Marly Bird's book Cold Weather Crochet. Can't find the book? You can buy this pattern here.

Cold Weather Crochet: 21 Cozy Garments, Accessories, and Afghans to Keep You Warm by [Bird, Marlaina "Marly"]

I like to try new crochet projects and then I sell then in my Etsy shop. This scarf is available for purchase!

Wintry Hooded Scarf, Over The Apple TreeWintry Hooded Scarf, Over The Apple Tree

Wintry Hooded Scarf, Over The Apple TreeWintry Hooded Scarf, Over The Apple Tree

Wintry Hooded Scarf, Over The Apple Tree

Wintry Hooded Scarf, Over The Apple TreeWintry Hooded Scarf, Over The Apple Tree

Wintry Hooded Scarf, Over The Apple Tree


I will be sharing with these great blogs!


Follow me here:

Wednesday, September 13, 2017

I CAN Knit!

I get asked constantly if in addition to crochet, can I also knit?


My mom taught me to knit and crochet when I was a kid, around 8 or 9 years old. I guess I just felt more comfortable with crochet because I kept that up over the years but never pick knitting back up again. Soooo, technically I might be able to knit something, but really, I never learned how to cast on, I don't know what all the stitches are called or how to do them and forget about reading a pattern. 

Most people don't actually know the difference between knit and crochet. Short answer, knitting uses the two pointy needles and crochet uses a hook. When I tell people I crochet they always assume I'm talking about knitting. Even though I'm a pretty accomplished crocheter, It always makes me feel inadequate that I can't knit. Want to see my crochet projects? You can take a look at my crochet blog posts or stop by my Etsy shop

The other day I saw a pair of knit fingerless gloves that I had to have and that's what did it, I was going to make them! Not so fast. I need three double pointed needles...what?? Ok, maybe I need to start on something a little easier and preferably on YouTube because for real, I don't know what I'm doing.

After looking at a billion tutorials, I decided on this video from B.hooked Crochet. I was a little worried with some of the negative comments but I had no problems following along at all! I got the same Clover needles(found at Michael's) recommended in supply list and I used Bernat Softee Chunky, Grey Ragg yarn.


I was so excited with my new hat, I even made another one! I got a little daring with this one, I made some size adjustments because I used a lighter weight yarn AND I use three different colors.


Subscribe and get my new blog posts sent to your inbox!


I will be sharing with these great blogs!


Follow me here:

Tuesday, September 5, 2017

Alternatives To PicMonkey- Change Is Hard!


It happened, I have to find a new photo editor...


I have faithfully used PicMonkey for years. I love it, it's fantastic. They have the basics to edit your photos, cool filters, lots of fonts, great overlays and special effects. If you don't mind paying $47.88 a year, go crazy on this site. PM used to be free with the option to get a premium membership and have access to additional features. I felt a change coming when I noticed more and more free features flipping over to premium access only. When I logged on there this weekend to add a watermark on my photo, I clicked export and got this pop up.

4 Free Alternatives to PicMonkey, Over The Apple Tree

Why!?!?!?!?! I'm still fixing the mess I was left with after Photobucket let me down, now this? Blogging and Etsy are my hobby, I'm not investing in a service to use once in awhile when I can get it for free somewhere else. Sorry PicMonkey, I'm breaking up with you.


**UPDATE(9/9): I just got on PM this morning and now it's allowing me to export my images again. I know someone who emailed them last week and supposedly they they confirmed they were moving to an all paid site. Even their Facebook page has people asking what's up. I don't know what exactly is happening, but it never hurts to have more options!

On the hunt for a replacement, I've discovered new photo editing sites that I never would have noticed. Even though change is hard and it will take time to get used to a new site, I'm excited to see what these new sites have to offer.

I use a photo editor for my blog and Etsy photos. I do basic edits to make it look as good as possible, resize photos, sometimes add graphics/title for blog posts and add watermarks. I played around with these online photo editing sites but have yet to really delve into every feature. Here are my thoughts so far...

1. iPiccy
Similar format to PM. You can do edits, collages and graphic design. This is a completely free site. I could not find any blocked features or offers to upgrade. I think this site is my favorite so far because all the options are available and it's easy to use. There are some things I had a hard time with though, like you can't go back and forth between layers to edit. If you can, I couldn't figure it out.

2. BeFunky
Similar format to PM. Offers edits, collages, design from blank canvas, templates for social media graphics, greeting cards. Option to upgrade to premium for $34.92. Looks to have what I'll need. One thing that bugs me is you have to click and open every sub-section to see your options for things like graphics and effects. So much clicking feels like time wasted. There are a few options listed for free and tons for premium members.

3. Ribbet
Built on the same platform as Picnik, so if you miss that site, you'll be happy here. Looks to have the features I'm going to need. You can do edits, collages, shape collages, design from blank canvas, and create cards. Something I find useful is that they save your recent uploads. There is an option to upgrade to premium for $29.95/year.

4. piZap
Offers two ways to use, HTML5 or Adobe Flash. You can edit, make a collage or design from blank. You can use the site for free and there is an option to upgrade to access all the features for $35.88. There are a variety of stickers available but I couldn't find basic shapes. That's no good for me since I often use a faded rectangle behind title letters on my blog pictures to make the letters stand out. This site does have a really cool cut out feature you should try.

All the sites I found have positives and negatives. None of them is going to work exactly like PM. Here are some more photo edit sites I checked out. They all offer great photo editing features but don't have some of the other tools I'm looking for.
LunaPic
Pixlr
Desygner

If you struggle with getting pure white backgrounds on your product photos, you HAVE to check out FotoFuze! For real, it's like magic and absolutely no skill required.

Looking to work on your product photography? Check out how I do mine!

Subscribe and get my new blog posts sent to your inbox!


I will be sharing with these great blogs!


Follow me here:

Monday, September 4, 2017

Etsy Packaging

Etsy packaging is an important part of your branding. Plus, isn't it nice to get a pretty package in the mail? 

Etsy Packaging Idea, Over The Apple Tree

I've been selling crochet items in my Etsy Shop for a few years now. I've always wrapped my things with kraft paper and tied string around them. I finished it off with a cute custom thank you sticker. I got to thinking I might want to try something different. I was looking into buying kraft paper bags instead. I ended up not getting any because the smallest batch I could find was a set of 50. That's way too many for me to try and I might want different sizes or end up not even liking it. What if I make my own bags? Yes, I realize that kraft bags are super cheap and some people may not consider it worth the time to make bags yourself. I had the time and the supplies already, so it was no big deal to sit down and make a handful of them.

Etsy Packaging Idea, Over The Apple Tree

It's brilliant really. This uses way less paper than I was when I was wrapping my items and I have custom bags for super cheap. I took my roll of Dollar Store brown paper and cut off a strip 8 inches wide. I fold the strip in half lengthwise and sewed with a zig zag stitch up the sides. With pinking shears I cut across the top opening of the bag for a decorative edge. The bag ends up looking way too long, but I did that on purpose so that I would have plenty extra paper to fold over. You can make any size you need this way.

Etsy Packaging Idea, Over The Apple Tree

Etsy Packaging Idea, Over The Apple Tree

Branding is easy with these simple bags, just add a custom stamp, tag or sticker. I designed my stickers myself and then sent them to Vistaprint for printing. You could print them at home yourself, but I'm usually able to get a great deal with a coupon code and I know they'll always come out great! Don't forget to drop in a business card and a thank you note!

Etsy Packaging Idea, Over The Apple Tree

I use this packaging for crochet items, but it could be used for all different types of items you may sell. I do not currently sell these bags.

Over The Apple Tree Etsy Shop, Crochet Cabled Cowl


Been thinking about opening an Etsy shop? How 'bout some free listings? Click HERE and we both get 40 FREE listing! How awesome is that? 

Get free Etsy listing when you use this referral link!


Subscribe and get my new blog posts sent to your inbox!


I will be sharing with these great blogs!


Follow me here:

Friday, July 21, 2017

Woman's DIY Muscle Shirt

Is it just me, or are woman's muscle shirts trending? While cruising Michael's, I snagged this awesome Wonder Woman t-shirt decal for a great clearance price. I knew I wanted a muscle shirt, but I didn't want to just cut the sleeves off a tee and call it a day. I found this tutorial for creating a tank top from an old t-shirt. This tutorial is perfect, you get the comfiness of a t-shirt and the top is sleeveless and slightly fitted like a tank. Best of all...NO SEWING!

DIY No Sew Muscle Shirt, Ladies Muscle Shirt by Over The Apple Tree

Monday, July 17, 2017

Strawberry Rhubarb Dump Cake

I love rhubarb. I want straight up rhubarb desserts. For me, there's no need to mix other stuff in to disguise the tartness, that's what makes it good! Well my husband and children would disagree. Sometime I wonder if these kids even belong to me! How can anyone not appreciate this wonderful unique vegetable? As much as it pained me to do it, I tried something new. Turned out it's crazy delicious! I received a recipe for rhubarb dump cake from my dad. He tried it and said that it was too sweet for him so I started experimenting and tweaking the recipe. Thankfully I have my own rhubarb plant that is gigantic, so I have lots to work with.

Strawberry Rhubarb Dump Cake, Over The Apple Tree

If you don't know, rhubarb is a stalky vegetable with large leaves. You cannot eat the leaves! You can find it growing wild outdoors, in the grocery store(fresh or frozen) or if you're lucky like me, you can have a thriving plant in your own yard. There are different varieties. Mostly you'll see the bright red stalks but my plant has green stalks with a little red on the bottom. I think they taste the same.

 photo credit: DSC09719 via photopin (license)


Recipe
1 can strawberry pie filling
4-6 cups cut up rhubarb(fresh or frozen)
1 box yellow cake mix
1 stick butter melted

little lemon juice, optional

This is a dump cake so you literally "dump" it all together. First combine the pie filling, rhubarb and a little lemon juice if you have it. I think the lemon juice gives it a little something, but if you don't have any it's fine without. I say 4-6 cups rhubarb because it depends on personal taste. I love the tartness of rhubarb so I put the whole 6 cups and even leave out a little of the strawberry jelly of the pie filling. 

The rhubarb and pie filling goes into the bottom of a glass baking dish. Now sprinkle the cake mix evenly on top of the fruit mixture. Yes, just the powdery cake mix. I find if I use the whole box it's too sweet for my taste. I usually sprinkle 2/3 of the powder. Now just evenly pour the melted butter all over the top. 

Bake in 350 oven for 45 mins to an hour. The top will start to get brown and the filling will be bubbly. Let it cool down because this is HOT! Serve with vanilla ice cream and try not to eat it all at once. 

Strawberry Rhubarb Dump Cake, Over The Apple Tree

Strawberry Rhubarb Dump Cake, Over The Apple Tree

Strawberry Rhubarb Dump Cake, Over The Apple Tree

Strawberry Rhubarb Dump Cake, Over The Apple Tree

Strawberry Rhubarb Dump Cake, Over The Apple Tree


I will be sharing with these great blogs!


Follow me here:


Friday, May 26, 2017

Lucky Prosperity Panda

Some of the ideas for my cutest projects are requests from other people! I have tons of things that I would love to try but I've also done projects that I never would have thought of if someone else didn't ask for it.

Lucky Prosperity Panda by Over The Apple Tree

Thursday, April 27, 2017

Thrift Store Hutch Makeover

I love the thrift store for two reasons. First of all, and I'll come right out and say it, I'm cheap. Second, I hate to see things get thrown away that just need a little TLC to make them awesome again.

Thrift Store Hutch Makeover by Over The Apple TreeThrift Store Hutch Makeover by Over The Apple Tree

Sunday, April 2, 2017

Mannequin Head For Crochet Hats

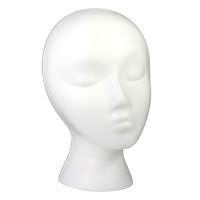
I've been making crochet hats for about 4 years now. I've mostly done children's hats, which I photograph using a painted styrofoam ball. Lately I've been doing more adult sizes. I didn't really have a good way to photograph them, aside from a live model. I finally decided to get a mannequin head!

Fabric Covered Mannequin Head for displaying crochet hats by Over The Apple Tree

Fabric Covered Mannequin Head for displaying crochet hats by Over The Apple Tree

I got mine from Michael's. It cost $5.99 but with a coupon, came out to be about $3.60. Not too bad and great pricing if you want more than one for a craft fair display. I've seen people take photos with foam heads where they just left them plain white, just how they bought them. I wanted mine to look different than everyone else's plus this foam can easily be damaged. I don't have a designated craft room so my supplies live in rubbermaid bins. Besides regular wear and tear, I have three kids here, who can't resist playing with a head! I was afraid all the moving around would nick and dent my head. I decided to cover my it in fabric. Besides looking nice, the fabric gives the head some texture so the hats don't slip around.

Fabric Covered Mannequin Head for displaying crochet hats by Over The Apple Tree

I didn't take pictures of the process, but it's fairly self explanatory. I cut fabric into strips about 1-1½ inches wide and long enough to go from crown of head to the bottom of the base. I put some Mod Podge into a disposable container and added a little water to thin it out. I dunked a strip of fabric into the Mod Podge, squeezed out excess and then stuck it on the head. To get around the nose, I cut a smaller strip the sized of the nose. Place it over the nose and cut slits in the sides to form fabric around nostril area. Each strip of fabric overlaps the one before. As I was working with the fabric, it did begin to fray a little. Just keep scissors handy to trim the threads.

Fabric Covered Mannequin Head for displaying crochet hats by Over The Apple Tree

This did take longer than I expected to dry. There are a couple areas where the fabric "bubbled up" as the glue dried. If I made this again, I think I might try using cheese cloth or a thinner cotton fabric.

I will be sharing with these great blogs!


Follow me here:

Friday, March 24, 2017

New Girls Poncho

My daughter requested a new poncho...

Girl's Poncho by Over The Apple Tree

I few year ago I made a granny square poncho for my daughter, She still wears it and it still fits, but she's older now. She has new style and color preferences. So off to the store we went to pick out a color. I'm thinking neutral, something that will match a variety of outfits. My eight year old and I were not on the same page. She chose red and there was no changing her mind.

I found a pattern I liked, I showed it to her, she liked the style. When it came down to it, we were debating between two different patterns. Of course, I lost again! So here's the two we liked. the first one (my choice) is the Rustically Elegant Shoulder Warmer and my daughter's pick was the Chelsea Wrap. Both of these patterns are easily altered to adjust size. So obviously I made the Chelsea Wrap, designed by Michele DuNaier because that's what girly wanted. It's a super simple design and works up quickly. Park your butt and turn on some Netflix! You'll be done before you know it!

Girl's Poncho by Over The Apple Tree

Girl's Poncho by Over The Apple Tree

I will be sharing with these great blogs!


Follow me here:

Wednesday, March 8, 2017

Recycled Yarn

Give unwanted sweaters from the thrift store a new life! 

Recycle Yarn From Thrift Store Sweaters By Over The Apple Tree

It takes a little work, but thrifted sweaters are a great place to source yarn. You can find unique and what might normally be expensive fibers, for a crazy low price. Bonus, you save a sweater from living the rest of its life in a landfill! There are plenty of posts out there showing how to take apart your sweater, how to chose the best and how to wash your yarn. Please defer to the experts, I'm an amateur with this! Here's a good post from How To Spin Yarn. Need more help? YouTube tutorials are great for visual learners!

Recycle Yarn From Thrift Store Sweaters By Over The Apple Tree

When picking sweaters, think about this...

Related Posts Plugin for WordPress, Blogger...