Saturday, March 9, 2013

Girl's Nightgown Made From Men's T-Shirts

Great Way To Upcycle Old T-Shirts

I used two men's undershirts for this peasant-style nightgown. This is for two reasons: first, it's nice to be able to reuse something that was destined to become a rag and second, I could have really messed this up and didn't want to waste money on fabric. Have I mentioned that I'm cheap? I know nothing about making clothes, but I wanted to give this a try and I really love how it turned out.

T-Shirt Upcycling by Over The Apple Tree

I didn't have a pattern to follow, pretty much made it up as I went along as you can see from my rough pattern I fashioned from scrap paper that was laying around! After I got an idea of the size and shape I would need from another of my daughter's shirts, I started cutting.


The back and front of the nightgown was cut from the backs of the t-shirts because these were v-necks and the backs had more surface area.


The sleeves I laid out and cut so that the original hem of the shirt would be the cuff of the sleeve.


Line up and pin right sides of fabric together. Sew these top seams.


Now, while still inside out, pin the bottoms of sleeves and down sides of gown. Sew together, stopping about an inch before you reach the cuff of sleeve.

OK, so I wasn't lying when I said I'm an amateur...look at this neckline! Not quite right huh? Believe it or not, I actually did this on purpose because I wasn't really sure how I was going to deal with this part and needed some wiggle room to figure it out.


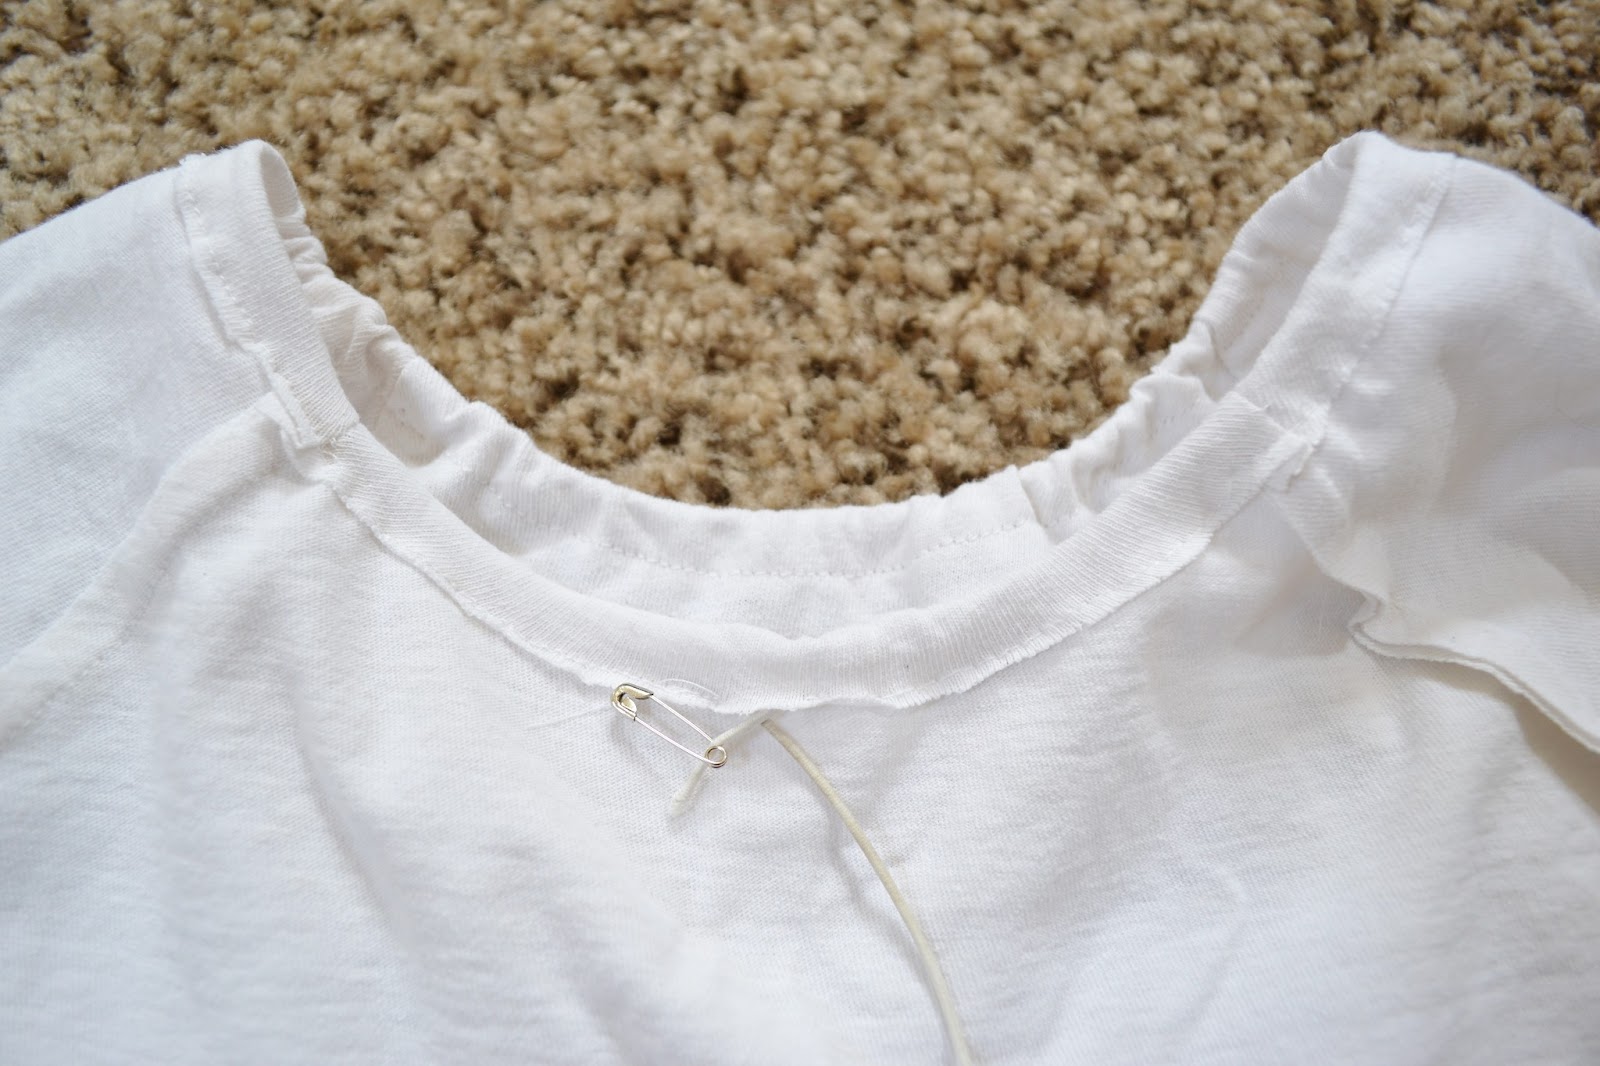
 After I figured out how wide I wanted it, I cut, folded over and sewed, leaving a small opening in the back so I could insert the elastic cord. Tie off cord and sew opening close.


The gown and sleeves weren't quite as long as I wanted, so I cut strips of fabric to ruffle and attach to bottoms.


 My thinking when I used the original seam for the cuffs was to insert elastic in it. I still wanted to do this, so when I attached the ruffle for the sleeves, I sewed very close to the edge making sure there was still room to insert elastic then closed up opening.


T-Shirt Upcycling by Over The Apple Tree

I added some decorative ruffle strips in the front and that's it! My daughter calls this her princess pajamas because it looks like what the Disney princesses wear!

T-shirt Upcycling by Over the Apple Tree


For more fun tutorials go HERE

I will be sharing with these great blogs

Follow me here:

Wednesday, March 6, 2013

Another Sock Creature

This is my first attempt at a sock creature. I have no idea what this is supposed to be, but whatever, it was fun to try something new. After this one I learned a few things...see my sock monkey tutorial.

So first thing to do is plan out what you want your creature to look like and how to cut up the socks.


Sew everything inside out, then turn right side out and stuff with fiber fill. You can't see in the pictures but I cut a slit in the back of the body so I could turn inside out to attach the ears with no rough seams on the outside. When I was done I just stitched it close with needle and thread.


I attached arms and legs with needle and thread, folding the rough cut edged inside so you wouldn't see them.


The heel of the sock forms the face and I decided later to add a mouth. You can see here that I used socks that were very thin and some of the fiber fill is started to creep out. Live and learn.


Thanks for visiting!

Sock Monkey Tutorial

You Can Make Your Own Sock Monkey!

I thought it would be a fun project for the kids and I to make sock creatures. I saw some cool patterned socks at the dollar store(anything for a dollar is sweet!) and started looking for easy to follow patterns. There are plenty online but I also checked the library* for kid friendly project books.


I originally started to follow this really good sock monkey tutorial I found on Pinterest, but then I started to veer off in my own direction. I will say, after doing a different sock creature where I cut out then sewed pieces together, the idea of sewing first and then cutting is totally genius!

Lay your two socks like this(inside out) and press with an iron. Mark out your pattern. These are the lines you are going to cut. Sew inside the lines. When sewing the legs, leave an opening about 2 inches in the crotch. This is where you're going to stuff the filling.


Cut out all your parts, turn right side out and stuff body, legs, tail, and arms. For the ears, I didn't stuff but after they were turned right side out, I stitches inside ear with sewing machine to give a little dimension.


After I closed up the legs, I started on the face. I went across the top first, stuffed, then closed up across the bottom folding under the rough cut edges as I went.


 To attach the ears, I made a horizontal cut where I wanted them to go, then pinched the ear in half, inserted and stitched in place.


The last thing to do is attach arms and tail. Again I folded the rough cut edges inside so it would have a more clean look. Done!


Check out all our sock creations! There are no rules, this is supposed to be a fun project. If My 12 yr old son can do, it anyone can.


***As "sweet" as dollar store socks are, they are in the dollar store for a reason. They are a little thin and when I ironed this pair for the monkey they actually melted a little! If I was doing this for as gift I would definitely use better quality socks.***

Side Note: The library is one of my very favorite places! I go there at least once a week, sometimes more. If you haven't visited a public library since you were learning the Dewey Decimal System and digging through the card catalog, they have definitely changed with the times. In addition to books, my library has all the new release movies and through their website you can find eBooks, audio books, music, eLearning tools and much more. Go check yours out!

Friday, March 1, 2013

Thrift Store Princess Mirror


I wanted to get a large mirror for my daughter's room for when she plays dress-up. Originally I was thinking to do something in decoden, but then I came across this fantastic mirror at my local thrift store. I know, to most people this didn't look as "fantastic" as it did to me, but the shape is what really caught my eye. When shopping in thrift stores, potential is what I'm usually looking for.


First thing you want to do is tape newspaper on the glass to protect it. In order to paint over this cheap laminate, I lightly sanded until I got most of the shine off. I then sprayed the Kilz primer and let it dry overnight. The pink paint is just one of those small samples you can get at Home Depot or Lowes. The sample sizes are really good for small projects like this, they're just a few dollars and you can pick ANY color! I did two coats of the pink and let dry overnight again. 


The gold flourishes weren't too hard. I first free handed the design on one side of mirror, then traced over it on a large sheet of paper. Flip it over onto the other side of mirror and trace the design again on the back side of the paper to transfer the original pencil mark.  After I had all my pencil marks done, I filled in with the gold paint. This metalic paint comes out looking really good, but it took 3 or 4 coats. To add more detail, I also used gold glitter dimensional fabric paint. This whole project is an exercise in patience...go slow! You don't want any air bubbles in this kind of paint and if you take your time to do it right, your less likely to have to try and clean up and redo mistakes.


Acrylic jewels are available at most craft stores, I got these ones at Walmart, found in the kids art isle(near the crayons). I attached these just with some Elmers glue. The beads are actually garland I found at Hobby Lobby during the holidays and I used a glue gun to keep in place.
After I had everything painted and glued how I wanted it, I did 2 or 3 coats of clear acrylic to seal everything in place. The princess of the house loves it!


Thank you so much for visiting my blog!
Project Gallery

I will be sharing with these great blogs!

Follow me here:


Friday, February 22, 2013

DIY Barbie House


Anyone who's known me for long enough, knows that I love me some Barbie! And yippee, I have a daughter to share it with. When she was old enough, I busted out the old Barbie bag. After seeing how much fun she was having, I thought it would be great if we could find a doll house for her new friends. Most of the projects I do are started because of one simple thing...I'm cheap! Have you seen how much those things cost?

DIY Barbie house by Over The Apple Tree

 My husband and I did this project together, he built the house and I did the interior. I've seen people use old book shelves for this, but I didn't have anything like that laying around, so we had to build something ourselves. He didn't follow any kind of plans for the structure, mostly eyeballed it and just used wood we found in the discount scrap bin at Home Depot. Talented man huh? We ended up with a really sturdy house that will last longer than anything we could have bought.

DIY Barbie house by Over The Apple Tree

DIY Barbie house by Over The Apple Tree

The interior was a little more fun, this is where you need to use your imagination. No way I was buying furnishings...time to get out the glue gun!

DIY Barbie house by Over The Apple Tree

 Here's a list of supplies I used:
Wall Coverings*- Wrapping paper(top) and scrapbook paper(bottom)
Flooring*- large sheets of felt
Windows*- white paper, blue paper, white  paper strips on top to make it look like window panes
   *These were all attached to walls with spray adhesive(use only in very well ventilated area!)
Chairs and sofa- foam blocks, cardboard, batting, fabric, glue gun. Cover base, sides, and back separately then attach together with glue gun.
Vanity and dresser- small boxes(I think they were from granola bars) covered in black duct tape. Drawers are cut out paper glued on
Bed- cardboard box(Capri Sun perfect size!), batting, fabric attached with glue gun
Wall art- magazine cut outs, cardboard, black duct tape, attached to wall with glue gun
Framed art- magazine cut outs, paper cut with fancy scissors Tutorial from My Froggy Stuff
Curtains- fabric scraps attached with glue gun
Fireplace- scrap wood, paper squares for tiles, fire painted on
Sink/counter- scrap of wood cut to fit, colored paper for sink, hook off a plastic hanger for faucet, clear beads for hot and cold, plant is chap-stick lid with fake foliage glued inside.
Coffee table- toilet paper rolls, cardboard, duct tape
Kitchen table and chairs-another tutorial from My Froggy Stuff on YouTube, this lady has some really great ideas!
Refrigerator is the only "bought" item but could easily be made with another cardboard box.

DIY Barbie House by Over The Apple Tree

 **Remember this is to be played with, so don't be shy with the glue,  you don't want it falling apart!**

I soon realized their 70's and 80's hand-me-down apparel wasn't gonna match the new digs...new project! I have basic/moderate sewing skills, so after looking online I found a couple dress ideas I thought I could pull off posted by Craftiness Is Not An Option.

 After that worked out and I had some more confidence  Ken got some clothes too! It's amazing the things you can accomplish if you just give it a try.    

DIY Barbie House by Over The Apple Tree
   

See more
Thrift Store Princess Mirror


Follow me here:
Related Posts Plugin for WordPress, Blogger...