Wednesday, August 31, 2016

Crochet Whale Project

"Can you crochet a whale?"

Crochet Whale by Over The Apple Tree

Well, I never would have thought of crocheting a whale. I mean what the heck for? I don't have a special affinity for marine mammals or live anywhere near the ocean. But when my family asks for something, I do it. I started searching for patterns and sending them to my brother to figure out what he had in mind. I knew he would have a very specific idea of what he wanted. Now here's what you get when a man is shopping for his male friend's new baby, of the few possibilities I found, this is the feedback I got..."Not the one with the blue eyes. Make them black and angry looking, I'm trying to scare his baby."

Wednesday, August 17, 2016

Girl's Crochet Cape

With fall around the corner, what little girl doesn't need a cozy cape!

Crochet Cape with flowers by Over The Apple Tree

This cape was made with this free pattern, Red Riding Hood And The Wolf pattern from Red Heart. What a difference a color change makes right?


One of the reasons I love Ravelry is that you can see other people's finished projects and read their comments or tips on the patterns. I post a lot of my projects there. All the comments on this pattern kept saying how small it was, small enough to fit a toddler. I thought, well, great, that's what I'm going for! This little cape is for my 1 1/2 yr old niece. I did the whole thing with my new 5.5 mm hook and guess what? It was big enough to fit my 7 yr old! Oh, all that time wasted...I had to pull it all out and start over again.

I realize the pattern calls for a 5 mm hook but I didn't really think it would make that big of a difference. Before I pulled out my project and my hair, I got my niece's measurements and compared them to what I had done. Since the hood needed to be a bit smaller, I decreased my center section to 60sc instead of 70. I added 5dc onto each of the side sections. My starting ribbing is the same 126 rows called for in the pattern. Sizes for crochet always depend on a person's own tension, you could get a different result than me as far as size goes.

Crochet Cape with flowers by Over The Apple Tree

Crochet Cape with flowers by Over The Apple Tree

This cape is really simple. It's all worked in one piece, then folded in half and sewed up the back. A great way to keep track of your rows when you first start is to use stitch markers. I marked every 50 rows of the ribbing so I wouldn't have to keep starting over my count. When I got to the main cape section, I used 2 stitch markers throughout the project to mark where my sc section began and ended. Another great way to use the stitch markers is to stick them in the beginning of your short row A so you don't loose track of how many sections you've done. I'm always picking up and putting down my projects, so these short rows would have gotten really confusing if I didn't mark it somehow.

I used two balls of Michael's Loops & Threads Impeccable Yarn and a 5.5 mm hook.

Crochet Cape with flowers by Over The Apple Tree

Crochet Cape with flowers by Over The Apple Tree

Crochet Cape with flowers by Over The Apple Tree

Crochet Cape with flowers by Over The Apple Tree

Crochet Cape with flowers by Over The Apple Tree


I will be sharing with these great blogs!


Follow me here:

Wednesday, August 3, 2016

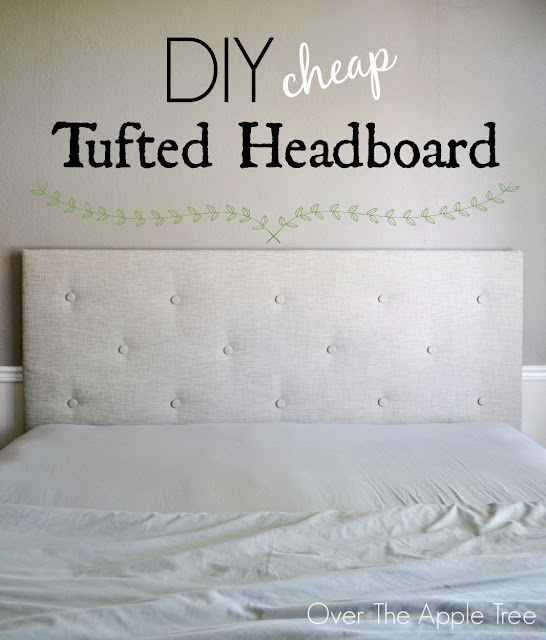
DIY Cheap Tufted Headboard

My house is still a work in progress and my bedroom is the last to get any special attention. I've been scoping out headboard tutorials for a while and this project ended up using a little bit of everything from all the inspiration I found on Pinterest.

DIY Cheap Tufted Headboard- Made with a piece of $10 styrofoam insulation board and faux fabric buttons by Over The Apple Tree

If you read my blog, you know I like to find the cheapest way to make things. That's one of the reasons I chose to use Styrofoam insulation board as the base for this headboard. One board cost me less than $10. The second reason is that it's incredibly light weight which makes it very easy to maneuver by myself and I could cut it to size with a kitchen knife.

So with the pros of the Styrofoam, there are also cons. You can't really nail, tack or staple into it because everything will just slide out. I'm also not 100% sure yet how durable this will prove to be. I have to admit, halfway through this project I was wondering if I made a mistake by not just going with the wood. I stuck it out, improvising along the way, and ended up with a beautiful inexpensive headboard that I love!

The supplies I purchased:
  • Styrofoam Insulation Board $9.57
  • 2 1/2 yards of fabric $6.25
  • Batting $7.97
  • Command Strips $3.94
  • duct tape

Related Posts Plugin for WordPress, Blogger...