Decorate Birthday Cakes Yourself!
My family is full of Sci-Fi nerds and my sons especially love The Lord Of The Rings and The Hobbit. I was originally going to do a regular Lego block cake but at the last minute decided to up the ante. Why not, I had a few hours to burn!
I checked online and of course, just when I'm thinking I'm all creative and original...someone else(actually a lot) already thought of this! It seemed they all had a different idea on how to go about making this cake so I just went to the store in search of anything that looked like it would work. Turns out I had pretty good luck because it came out pretty close to my vision.
I used two cake mixes. I poured one into a 13x9 cake pan and the other I poured half into a round cake pan and the rest I put into cupcakes. To form the house I leveled off the top of the 13x9 and flipped upside down onto the serving platter. I cut the round in half and leveled off only the bottom layer, flipped over, and stacked halves on top of each other. The top layer should have the rounded top.
You can pretty much see from the pictures what I used to construct the rest of the house.
Here is a list of my supplies:
Graham Crackers
Chocolate frosting(to glue the goodies on the front of house)
Chocolate Cookies
Kit Kat
Hershey Bar
Sugar Daddies
Candy Pumpkins
Chocolate Marshmallows
Flower Shaped Sprinkles
Pretzels
Grape Stem(tree)
 |
| Chocolate Marshmallow Boulders |
 |
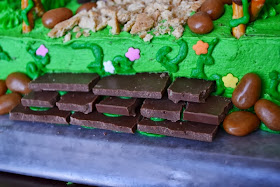
| Hershey Stairs |
 |
| Grape Stem Tree |
 |
| Pumpkin Patch |
Look at that face...it's all worth it!
"In a hole in the ground there lived a hobbit. Not a nasty, dirty, wet hole, filled with the ends of worms and an oozy smell, nor yet a dry, bare, sandy hole with nothing in it to sit down on or to eat: it was a hobbit-hole and that meant comfort."
- J. R. R. Tolkien
To see more of my cake creations visit my cake gallery
I share with these great blogs
Follow me here:

.jpg)


.jpg)
.jpg)
Looks amazing! Even though my son is 18, I think he would love a cake like this, because he's such a LOTR's fan. You've inspired me :)
ReplyDeleteGreat! Thanks for visiting!
DeleteMy goodness. What a cake! And he looks in awe! How long did it take?
ReplyDeleteThanks for visiting Abbe! From the time I started making the frosting until I was done decorating, it was about two hours. Remember to factor in the amount of time I spent chasing the kids away from my candy!
DeleteI apsalutly love! it how did you think to do a grap stem for the tree?
DeleteI think I saw on Pinterest someone had took a grape stem, dipped it in chocolate then dipped it in green colored rice krispies for the leaves. I didn't have time for all that so I threw some green frosting on there and called it a day!
DeleteOh this is lovely! Absolutely fantastic. I have a pinterest board for amazing cakes and this defiantly qualifies!
ReplyDeleteThanks so much Julia, come visit me again!
DeleteLoved this cake and I made one just like it for my son's 5th birthday today. I used chocolate for the top and white cake for the bottom. It was such a hit. Thanks for posting and making the instructions so easy to understand. BTW, using the graham crackers was genius. I think I'll be doing that again with other cakes I make in the future.
ReplyDeleteThat's so great to hear! Thank you for visiting my blog!
DeleteAwesome cake! What kind of frosting did you use for the grass and vines?
ReplyDeleteWhipped up a huge batch of butter cream frosting for the whole thing, used different tips on my piping bag to do grass and vines.
DeleteI'm aout to start this. Why did you use the graham crackers in the front and then cover them all up?
ReplyDeleteI didn't think the soft cake could hold the weight of the door and windows candy.
DeleteHas anyone made this cake in stages, and frozen it? My daughter wants to bake and after it cools, add the base frosting, then freeze it for a few days.
ReplyDeleteShe would then thaw add the finishing decor the day the cake is needed.
Would this work out without creating a disaster?
Any advice would be appreciated!!
This looks amazing!! I tried this once, but it didn't look near as good. I'm ready to try again, though!
ReplyDeleteOne question... how did you make your icing so green??
ReplyDeleteI made this a long time ago but I think I used food Wilton coloring, not the grocery store liquid drops.
ReplyDelete