Pages

Monday, July 29, 2013

Classic Chocolate Chip Cookies

Chocolate Chip Cookies - Better Homes and Gardens Recipes

Who doesn't love chocolate chip cookies? I've tried a bunch of different recipes and I always go back to this one.


Prep: 25 minutes        Bake: 8 minutes per batch

1/2 c shortening(I use butter flavor)
1/2 c butter or margarine
1/2 c granulated sugar
1 c packed brown sugar
1/2 tsp. baking soda
2 eggs
1 tsp. vanilla
2 1/2 c all-purpose flour
1-12 oz package (2 cups) semisweet chocolate chips
1 1/2 c chopped nuts(optional)

  1. In large mixing bowl beat the shortening and butter with electric mixer on medium for 30 seconds. Add sugars and baking soda. Beat till combined, scraping sides of bowl. Beat in the eggs and vanilla till combined. Beat in as much of the flour as you can with mixer, stir in remaining flour and chocolate chips with large spoon.
  2. Drop dough by rounded teaspoons 2 inches apart on ungreased cookie sheet. Bake in a 375° oven 8-10 minutes or till lightly browned. Transfer to wire rack to cool. Makes about 60 cookies.


Source: Better Homes and Gardens

The  first Better Homes and Gardens cookbook was introduced in 1930 and has been found in America's kitchens ever since. It was in my kitchen growing up and is still the place I go to look for classic recipes as well as new ideas on those days where I just don't know what to make. I thought it would be fun to share my favorite recipes that I cook for my family and maybe try some new ones. Some of the recipes I follow may be different that those you find on the BHG website just because the BHG test kitchens are always updating their recipes to reflect changes in America's tastes, techniques, and lifestyles. Any recipes I make will be coming from Better Homes and Gardens, New Cook Book(11th and 14th Edition) and Better Homes and Gardens, Our Best Recipes. 

Friday, July 26, 2013

Designer Inspired Lampshade

Designer Knock-off Lampshade

I got some "PINsperation" for this lamp shade from Mama Says Sew. They have a great tutorial here that I followed with a few small exceptions. I'm not going to rewrite the whole tutorial but I will let you know what I did differently. First of all, get comfortable in front of a movie or marathon of your favorite TV series because this takes some time!


I had an old, king size, white, flat sheet and I cut it in half. I dyed one of the halves pink with some Rit dye in the washer. Cut out a piece of fabric to cover the lamp shade and use the rest for tearing the strips. Some of my strips were slightly larger than the 1 inch recommended in tutorial = fatter flowers(swirls). The tutorial says you should not attach fabric to shade yet and then hold the flowers in your hand, glue and flip onto fabric. I believe it should read...flip and pray it landed in the right spot and didn't unravel! After flipping the first few, I changed my method because apparently I don't have the coordination for doing it that way. 

I used a light layer of spray adhesive and attached the fabric to my shade, if you don't have it on there straight, you can always re-position. Then hot glued the seam, top and bottom edges over.  I found the best way to get the glue on the flower is to hold the glue gun a few inches over it and move back and forth, letting the glue fall where you want it. Holding the flower in my hand, I grabbed the fabric covered shade and lowered it down into the glued flower. 


My lampshade doesn't look exactly like Mama Says Sew tutorial or the original Anthropologie one for that matter, but it works for me.

** original tutorial I followed from Mama Says Sew's blog

Thank you so much for visiting my blog!
Project Gallery

I will be sharing with these great blogs!

Follow me here:

Wednesday, July 24, 2013

Bloglovin'

Follow my blog with Bloglovin

There are so many amazing blogs out there...ever feel like your missing out? Bloglovin' helps you keep track of the blogs you read by letting you know when they update, all in one place! They even have an android and apple app so you can read your fav blog on the go. If Google Reader left you hanging, you can migrate your blogs over to your new Bloglovin' account.


Wednesday, July 17, 2013

Family Love Carved Tree

Carved Names Into Tree...

...makes a unique wall hanging


I saw an idea where someone had carved a heart into a tabletop and the idea for this project evolved from there. I've been wondering what to do with some huge logs we had left in the back yard from an old cut down tree. They've just been sitting there forever and I'm so glad I was finally able to recycle it into something fun.

Family Love Carved Tree, make a unique wall hanging from an old tree by Over The Apple Tree

Figure out the size and shape of wood you want.


After we got the cut of wood we liked, time to smooth out all those marks from the chainsaw. This is the hardest, but most important part. Remember, if you stain, it's going to creep into the parts you miss. The bark fell off the sides so I brushed off anything that was loose and just left it.


Mark where you want names with a pencil. Since I wanted the heart to be more prominent and also look like it had been there longer, I used a wood burning tool to go over that part. Then, using a knife, I carved out my kid's names. I wanted it to look like the heart was there first and then we added the kids names later.


When you have it the way you want, stain and polyurethane the whole thing(even the sides). I also added a saw-tooth hanger. Since the wood was a little soft, the tiny nails that came with the hanger to attach it were just sliding out. I had to use longer nails and then bend them up.


Family Love Carved Tree, make a unique wall hanging from an old tree by Over The Apple Tree


Family Love Tree Carving >> Over The Apple Tree


Thank you so much for visiting my blog!
Project Gallery

I will be sharing with these great blogs!

Follow me here:


Thursday, July 11, 2013

Shrimp in Coconut Sauce

Shrimp in Coconut Sauce


While looking for something new for my Puerto Rican husband, I found this great recipe on the Goya Food website. 

Shrimp in Coconut Sauce by Over The Apple Tree

Ingredients

1 1/2 lbs. large shrimp, peeled and deveined
1 tsp. GOYA® Adobo with Pepper**
3 tbsp. Olive Oil
2 cups finely chopped onion
3 scallions, sliced very thin, both white and green (reserve 1 tbsp. green part for garnish)
3 cloves fresh garlic, minced
1/2 cup Tomato Sauce
1 cup clam broth(I use chicken broth)
1 can (13.5 fl. oz.) GOYA® Coconut Milk
Accompaniment:
4 cups hot cooked white rice

Directions
  1. Season shrimp with Adobo and set aside
  2. In a skillet, heat oil on medium. Stir in onion, scallions and garlic and cook, stirring often until onion is translucent, about 10 minutes
  3. Stir in tomato sauce and cook for 5 minutes
  4. Stir in clam broth and coconut milk, bring to a boil, lower heat and simmer for 5 minutes
  5. Add shrimp and cook, turning once, until shrimp are just cooked through, about 5 minutes
  6. Transfer to serving platter, garnish with scallion. Serve with rice.
This is great served with tostones(fried plantains). Recipe HERE

**Goya Adobo is a great all purpose seasoning. I know you might not like to buy an ingredient for for just one recipe that may never be used again, but don't feel bad about getting this one, it's good! We used it for everything from eggs at breakfast to thanksgiving turkey. It's especially good on pork and chicken.


Thursday, July 4, 2013

Veggie Pizza

Veggie Pizza

My mom has made this for years and I think it may have originated from Taste of Home Magazine
Veggie Pizza by Over The Apple Tree

Ingredients:
  • 2 tubes refrigerated crescent roll dough
  • 2 pkgs cream cheese
  • 1/4 c. ranch dressing(I used creamy Italian because I ran out of Ranch)
  • assorted veggies(I use red onions, fresh broccoli, carrots)
Unroll crescent dough and place onto an ungreased cookie sheet, pressing seams together. Bake according to directions until golden brown. Cool. You can see on mine that I didn't push the seams together very good because they separated during baking. No biggie.


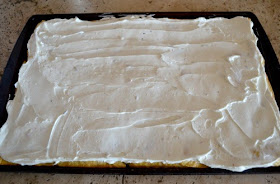
Combine cream cheese and dressing in a bowl. Allowing the cream cheese to sit for a little at room temperature will make it easier to mix. Spread mixture over crescent rolls.


Chop veggies into small pieces and sprinkle on top. Keep refrigerated until you serve.


Tuesday, July 2, 2013

UPDATE: Grow An Apple Tree from Seeds

Apple Tree Update

This is an update to my post from April about how to grow an apple tree from seeds. You can read that post here. I started with about seven strong plants and after giving away a couple, I have three left. One of the three(not pictured) is not as happy as the other two. I'm trying to figure out what to do with that one.

Let me start off by saying that I kill all plants. The fact that there are three still alive is an actual miracle! I can't really say for sure why some of these just wouldn't grow, but I have a theory. The seeds that I used came from two different apples. One was a Granny Smith and one was either a Fuji or Braeburn. I'm thinking one of these types was not good for this project or may have needed a different environment. I have no idea which was which because we had them mixed together.

My trees are different sizes because I was moving them around into different size pots. In my tutorial I said that the trees could be planted outside when they reach 1.5-2 feet tall, but I think I'm going to place them in large pots and keep indoors until next spring. I live in a dry climate and want to make sure they are very strong before I exposed them to the elements.

My family and I have really enjoyed this gardening project and are continuing experimentation with
more seeds we find.