Pages

Friday, May 23, 2014

Matryoshka Wood Burning

My new Matryoshka project!

I've been working on this on and off for a while and finally sat down and actually finished it! I have tons of scrap wood in the garage and I have been thinking about trying a wood burning design for a while. Since I'm going crazy with Matryoshka dolls right now...why not!

Matryoshka woodburning and water color project, Over The Apple Tree

First thing's first, decide on a design...
There are so many options for these dolls, it was really hard to pick how I wanted this to look. In the end, the simplest design to burn won. I'm not a wood burning master, so I figured why make it harder than it's already going to be.


Matryoshka woodburning and water color project, Over The Apple Tree

Transfer your design...
After I decided on the design I cut it out and then traced with pencil on the back. I flipped it over and traced again, transferring the pencil mark to the wood.

Before I started to burn the wood, I used the wood burner tip(not turned on) to score my pencil marks. Since my wood was so bumpy, this made it easier to stay in the lines and gave me less opportunity to mess up when the wood burner was on.


Matryoshka woodburning and water color project, Over The Apple Tree

Burn the design...
Turn on your wood burner and go for it! I've used mine a few times for other projects, but if you haven't used a one before, practice on some scrap wood first. This way you can get a feel for how fast to move and the pressure to use.

My original plan was to just burn the design and stain the wood, but then I wondered what would happen if I put some watercolor on there. It gave it color without covering the wood grain, which I love.

Matryoshka woodburning and water color project, Over The Apple Tree

Seal with polyurethane...
When I was done I added one coat of matte polyurethane to protect the watercolor. I'm thinking I'm going to add a hook on the back so I can put this up on the wall. 

Matryoshka wood burning and watercolor project, Over The Apple Tree


Thanks for visiting!
See my project gallery for more projects I've been working on


Thank you so much for visiting my blog!
Project Gallery

I will be sharing with these great blogs!

Follow me here:

Tuesday, May 20, 2014

Crochet Rocks For Unique Teacher Gift

I found another excuse to crochet some rocks! I did this the first time for wedding favors and thought it could also work for an inexpensive end of year gift to our favorite teachers.

Crochet rocks make a fun end of year gift for teachers, Over The Apple Tree

You can find patterns for doilies all over the internet, and after you've done a few it's pretty easy to make it up as you go. A lot of people have asked how I actually get the doily on to the rock. I literally crochet it on. When the doily is the size you want it, start making loops of chains connected to the previous row with single crochets. position it on to the rock and continue with chains and single crochets, reducing the number of chains to make it tighter.

Crochet rocks make a fun end of year gift for teachers, Over The Apple Tree


Crochet rocks make a fun end of year gift for teachers, Over The Apple Tree

My personalized tags 
I created an image on Picmonkey then inserted the image into a word document. First arrange three of the images in the first row. After it's spaced how you want, just select the entire first row, copy, press enter to skip down to the next row and paste. Repeat this until you have the number of tags you need, print on card stock and cut out.


Crochet rocks make a fun end of year gift for teachers, Over The Apple Tree

 The pattern for this rock can be found at PIE: Pieces I Enjoy
Check my Gallery for more tutorials.


I will be sharing with these great blogs!


Follow me here:

Follow Over The Apple Tree's board So Much Yarn, So Little Time on Pinterest.

Wednesday, May 7, 2014

Frozen Chicken and Rice Burritos

I have a teenage son. He hasn't stopped eating for six months! No lie. This child has eaten a whole box of cereal for breakfast, the whole box...by himself! I started buying packages of frozen burritos specifically for him to eat when he needs a snack or for after he's eaten all the rest of the food in the house. Those pre-made frozen burritos aren't terribly expensive but he was going through the 8 ct. packages pretty fast and lets face it, they can't be that healthy. I'm not even sure exactly what's in there. I figured I should make my own. I can do a large batch, it has to be cheaper than buying and best of all, I know what's inside it.

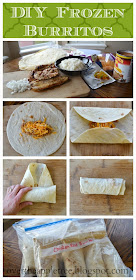
Chicken and rice burritos, make your own frozen burritos - Over The Apple Tree

I'm not the first to blog about frozen burritos, I've seen them on Pinterest. We all do them a little differently though, so I figured I'd share mine too. This recipe is for chicken but you could use any other meat. The first batch I ever made was with leftover roast pork. They turned out amazing and finding new ways to use leftovers is always great. The best thing about making these burritos is that this recipe is very flexible, use it as a guideline. You like peppers, potatoes? throw 'em in there!


Chicken and rice burritos, make your own frozen burritos - Over The Apple TreeIngredients: 
  • 3 chicken breasts(cooked and diced)
  • 1/2 onion diced
  • 1 can refried beans
  • 1-2 servings cooked rice(instant Minute Rice is perfect for this)
  • 1 envelope taco seasoning
  • 1 1/4 cup water
  • grated cheddar cheese
  • 2 packages tortillas

OK, here I'm talking about knowing what my kids are eating and I put in taco seasoning from an envelope! Gasp! I know, I know...if you make your own taco seasoning, you're awesome, use it! 

First, cook and dice/shred up your meat. Prepare your rice. If you don't regularly eat rice, instant Minute Rice is fast, and works great for this recipe. In a large pot place chicken, onions, refried beans, taco seasoning and water*. Warm up and stir all indredients just until combined over medium heat. Stir in the rice.

*Depending on your taste, you might not want to add the entire package of taco seasoning. Start with half and see how it tastes. If you cut back on taco seasoning, you might also want to cut back a little on the water as well. 

Remove from heat. I warm up tortillas a few at a time in microwave before I start wrapping because I think it makes them easier to work with and less likely to rip. Spoon your filling in center of tortilla, add some cheese and wrap. Place finished burritos in ziploc bags and freeze! To heat, microwave for 2 minutes, flipping over after 1 minute.

How many burritos you get will depend on how much filling you use in each. I end up using a little more than the one package of tortillas, which is why I say get two. You can always place your leftover tortillas in the freezer and save for the next time you make burritos.

Chicken and rice burritos, make your own frozen burritos - Over The Apple Tree

See all my recipes

I will be sharing with these great blogs!


Follow me here:
Follow Over The Apple Tree's board Just Eat! on Pinterest.